RepRapPro Huxley maintenance
Introduction | Frame assembly | Y axis assembly | X axis assembly | Z axis assembly | Heated bed assembly | Extruder drive assembly | Hot end assembly | Wiring | Commissioning | Printing | Maintenance | Troubleshooting | Improvements
| A notice about these instructions! |
|
These instructions are open to editing by everyone and anyone. |
Contents
Uploading new firmware
The firmware is the computer program that resides in the microcontroller chip on the controller printed circuit board.
Required software
Get the Arduino IDE from here.
Add the Sanguino files to your Arduino hardware folder.
Git repository
Firmware source code is stored in the RepRapPro git repository. Copy this into your ~/sketchbook folder to make it visible within the Arduino IDE.
Uploading
Launch the Arduino IDE, and open one of the two the firmware projects (depending on your electronics board): Sprinter_Melzi or Sprinter_Sanguinololu.
Select the Sanguino board from the Tools | Board menu.
Ensure the serial port is ticked from the Tools | Serial port menu (the Huxley controller board must be physically connected to your computer with the USB cable at this stage, and the auto-reset jumper must be fitted to the board).
Select the tab for the file Configuration.h. At the top are the following lines:
// Uncomment ONE of the next three lines - the one for your RepRap machine
//#define REPRAPPRO_HUXLEY
//#define REPRAPPRO_MENDEL
//#define REPRAPPRO_WALLACE
Uncomment (i.e. remove the two // characters) from the line corresponding to your machine.
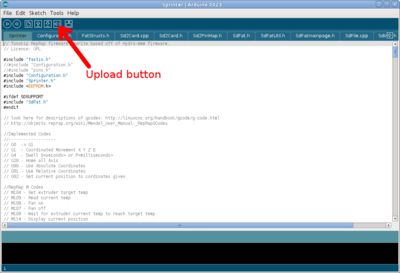
Upload your firmware.
Dismantling the hot end
With care you can completely to dismantle the hot end:
- Cut the PLA filament so that you have about 300 mm sticking out of the feed side of the drive.
- Loosen the spring screws on the drive (or remove them) so that the filament is not being gripped at all.
- Pull the tongue out of the drive to release the brass coupling. Pull the filament through the drive so the PTFE tube and filament are free.
- Run the hot end up to temperature, and wait for about 30 seconds.
- Push the filament through by hand so that it extrudes slowly. Push about 100mm of filament through to get fresh material right through the hot bit.
- Turn the heat off, and watch the temperature as it cools. Clean any extruded filament away from the end of the nozzle.
- When it gets down to 100 C, pull the free end of the filament gently but firmly. At that temperature the plastic should be soft enough to come out of the heater assembly, stretching a bit. But it should be coherent enough to hold together; it should all come out, right down to the nozzle, leaving the filament path completely empty.
- Disconnect the power and wait for everything to get to room temperature.
- Disconnect the hot end wires from the controller board, and slacken the two screws that hold the hot end to the X carriage. Take the hot end off the machine.
- Cut the cable ties on the fan heatsink that retain the wires.
- Unscrew the fan and heatsink and set them aside.
- Unscrew the PTFE cone at the bottom of the nozzle, and set that aside. For the next three steps, take care not to damage the wiring as you unscrew things. Take your time and hold the wires out of the way.
- With long-nosed pliers unscrew the brass end of the PTFE tube from the long block. Set the PTFE tube aside.
- Unscrew the long block from the short double-threaded stainless steel tube. Set the long block aside.
- Retrieve the short length of PTFE from within the counterbored recess in the stainless tube. Set it aside.
- Carefully remove the crimps from one end of the thermistor wire and the heater resistor wires.
- Pull the heater resistor and the thermistor out from the other end of the aluminium block.
- Gently hold the aluminium block in a vice, and use an adjustable spanner on the flats of the brass nozzle to unscrew that.
- Unscrew the stainless steel tube, taking care not to damage its threads if you have to grip it.
- Clean all residues of PTFE tape from the components.
To reassemble the hot end, follow the instructions on the hot end assembly page.
