Screw-drivenLinearAxis
Contents
The RepRap Screw-driven Linear Axis
Version 1 *DRAFT*
-- Main.VikOlliver - 04 Dec 2005
1. Summary
This describes how to construct one of the two types of linear axis envisaged for use in the RepRap from FDM'd parts. As with other RepRap components, this axis was designed to be made by the RepRap rapid prototyper itself, and thus consists of standard parts plus rapid-prototyped components. No modifications are required to the standard components.
The axis designed to be stepped back and forth to an accuracy of better than 0.1mm by means of a stepper motor and threaded rod. The axis is designed to transport a carriage containing the Vertical Platform.
Assembled linear axis with Meccano carriage and spider for scale.
2. Introduction
The axis is derrived from an experimental Meccano axis, used to produce parts from EVA during the early stages of RepRap development. Ed Sells Has already designed a marvelous linear axis that uses a belt drive as part of his work on Bend Alloy deposition. The resolution of that platform is limited by the step size of the motor and diameter of the pulley - a 48-step motor would need a pulley of 1.5mm diameter to achieve 0.1mm step resolution. Fortunately 400-step stepper motors exist, but seem to be more expensive than the ones with lower step counts. This screw-driven version cheaply eliminates the belt and pulleys to increase the accuracy at the expense of speed.
A stepper motor is attached to a clamp by long bolts. A matching clamp holds a bearing, and between them the two clamps hold two guide rods.
A length of studding (threaded rod) is attached to the stepper motor with a flexible plastic coupling such that the studding passes through the centre of the bearing at the other end. Plastic washers and opposing nuts are used to secure the threaded rod to the centre race of the bearing.
The carriage slides on the two guide rails, and is attached by two restricted sliding linkages to two more nuts on the threaded rod. Rotation of the rod causes the nuts to draw the carriage back and forth.
The control electronics are currently hand-assembled, and attach to the ad hoc frame used to hold the axis to the workbench. No machining other than basic cutting of the hardware is required to assemble the axis itself.
3. Assembly
The axis described here is 450mm long. It may be readily reduced in length, but extending increases the sag in the threaded rod, which eventually becomes unmanageable - particularly if the threaded rod is not perfectly straight to begin with.
Cap screws are the preferred fastenings, but where they are not readily available posidrive cheese head screws come a close second. Due to the fragile nature of the FDM components, washers MUST be used both under the screw heads and under nuts unless the nut is held captive.
3.1 Rails and Threaded Drive Rod
Take two well-formed M5 steel nuts and screw them on to the 450mm length of steel M5 studding (E) a fair way towards the middle. These will be used to attach the carriage to the threaded rod, and it is really annoying if you forget to put them on at this point.
Cut 4 x 2mm lengths of 4mm ID black PVC tubing (F), ensuring that the ends are squared off properly - cut a few and use the best ones. These are the PVC washers which attach the threaded rod to the bearing. Place an M5 nut on the threaded rod, and screw it on about 50mm. Force one of these PVC washers onto the threaded rod (it is more pliable if briefly dipped in hot water or held under a hairdryer), and screw it approximately 25mm down the shaft. Slide the bearing (B) on after it, and then screw down another PVC washer so that the bearing is gently confined between the PVC washers. Add another M5 nut on after, and do the two M5 nuts up so that they compress the washers against the central race of the bearing. DO NOT overtighten. The washer must not be squashed so that it bulges out past the central part of the bearing, or it will interfere with rotation.
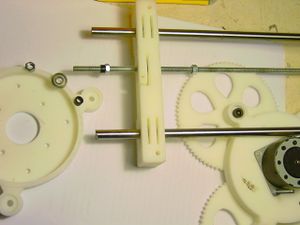
- Collage showing rail clamp, bearing and spider mechanism.:
Take two lengths of the ground steel rod (an angle grinder with 2mm cutting disk makes short work of the task of halving, even when you put the safety gear on first) and slide them into the 8mm holes so they extend alongside the threaded rod and link the clamps together. The fit should be very snug, but if necessary use the M4 holes and nut-shaped recesses in the rail clamps to tighten the clamps onto the rail.
With the rails in place, align everything square. The threaded rod must rotate freely in the bearing. It is only necessary to prevent the rails moving, not to squash the clamps flat. No significant horizontal forces are experienced by the rails in operation.
3.2 The Motor and Coupling
Now we need to attach the stepper motor (H) using a flexible coupling. This uses a 15mm section of 2mm ID PVC tubing (G) - cut with a sharp craft knife - slipped over the motor's shaft, which should leave a few mm protruding past the end of it (adjust length to suit shaft). An M5 nut is then placed on the end of the M5 studding, and screwed down about 20mm. A 20mm section of 4mm ID PVC tubing is then screwed onto the M5 studding, secured by tightening the M5 nut against it, and providing a socket that will accept the 2mm sleeve on the stepper motor shaft.
Secure the motor against the side of the clamp, opposite the unused bearing clamp, with 2 x 25mm M3 screws, nuts and washers. Ensure it is as centrally located as possible.
Thread the socket end of the studding through the bearing hole, down the length of the assembly and towards the motor. Push the sleeved shaft into the socket as far as it will go. The socket will grip the sleeved tightly where it is expanded by the shaft itself. If necessary, trim the length of the socket or truncate the protruding 2mm sleeve to ensure a robust fit of minimal length.
Fit the bearing into the matching cavity of the other rail clamp (A) so that it is in the centre of the flexible clamp section and secure with a ??mm M3 cap screw, 2 washers and nut. Don't forget the washers. If you think you can forget the washers, you're wrong. If you doubt that, talk to Adrian.
Rotate the assembly by hand or with a slow-speed drill and iron out the worst of the kinks. If the flexible coupling is off-centre, warm it with a hairdryer and vigorously manipulate back on centre again.
3.3 The Carriage
The carriage (C) should sit neatly on the rails and slide smoothly back and forth. Tinker with things until it does, apply favoured rail lubricant as necessary and so forth.
NOTE: If friction is still too high, consider placing small pulley wheels (Meccano make some good ones) in the cavities at the corners of the carriage, and insert axles into the holes provided, shimming as necessary. Fix axles in place with a small quantity of Loctite adhesive. This is an emergency measure, and hopefully will not be required.
Take an M3 washer and slide it onto an ??mm M3 screw. Slip a linkage (L) onto the screw through the large hole, and add two M4 washers. This is not a misprint. Insert the screw into the hole in the end of the carriage as shown, and finish with an M3 washer and M3 Nylock nut. Repeat process on other end of carriage with other linkage.
TBA
4. Electronics
TBA
5. Components
Mechanics (Under development)
| Number off/quantity | Description | Supplier |
| 2 | rail clamps (A) | RP part |
| 1 | carriage (C) | RP part |
| 2 | linkages (L) | RP part |
| 3 | nut holders | RP part |
| 1m | 8mm ground steel rod, halved (Z) | ??? |
| 1 | 13mm OD, 5mm ID minature bearing (B) | RS (540-334) |
| 450 mm | steel M5 studding (E) | RS (530-315), Farnell (517343) |
| 100mm | 4mm ID PVC tubing (F) | Garden shops & hydroponic centres |
| 15mm | 2mm ID PVC tubing (G) | Garden shops & hydroponic centres |
| 1 | Unipolar 12V 7.5 deg stepper motor 49.5mm centres | Mitsumi M42SP-5 |
| 4 | steel M4 nuts | RS (525-896), Farnell (149682) |
| 2 | steel M3 nuts | RS (837-206), Farnell (758796) |
| 2 | steel or brass M3 washers | RS (560-338), Farnell (149687) |
| 1? | steel 25 mm M3 cap screw | RS (376-4555), Farnell (100165) |
| 1? | steel 35 mm M3 cap screw | Toolfastdirect (0150M390035) |
| 1? | steel 30 mm M4 cap screw | RS (376-4656), Farnell (8840482) |
| 2? | steel or brass M4 washers | RS (525-925), Farnell (149689) |
| 2 | M3 Nylock nuts | Hardware store |
Electronics
TBA
6. To Do
This could be a depressingly long list, but fundementally the thing works.
- Modify the rail clamps to use star-shaped holes.
- Generally cut down on the bulk of plastic used.
- Create a carriage that can directly support a linear stage.
- Add end stop detectors.
7. Licence
RepRap is copyright 2005 University of Bath, the RepRap researchers (see the project's People page), and other contributors.
This web page and all the other files in its download are covered by that copyright.
Principal author:
Adrian Bowyer Department of Mechanical Engineering Faculty of Engineering and Design University of Bath Bath BA2 7AY U.K. e-mail: [email protected]
RepRap is free; you can redistribute it and/or modify it under the terms of the GNU Library General Public Licence as published by the Free Software Foundation; either version 2 of the Licence, or (at your option) any later version.
RepRap is distributed in the hope that it will be useful, but WITHOUT ANY WARRANTY; without even the implied warranty of MERCHANTABILITY or FITNESS FOR A PARTICULAR PURPOSE. See the GNU Library General Public Licence for more details.
For this purpose the words "software" and "library" in the GNU Library General Public Licence are taken to mean any and all computer programs computer files data results documents and other copyright information available from the RepRap project.
You should have received a copy of the GNU Library General Public Licence along with RepRap; if not, write to the Free Software Foundation, Inc., 675 Mass Ave, Cambridge, MA 02139, USA, or see
http://www.gnu.org/
-- Main.VikOlliver - 25 Nov 2005
- [[File:Screw-drivenLinearAxis-rail clamp.stl: Rail and bearing clamping block used for screw-driven linear axis.|thumb]]
- [[File:Screw-drivenLinearAxis-rail clamping block.aoi: AoI file of clamping block for screw-driven linear axis|thumb]]
- [[File:Screw-drivenLinearAxis-rail clamping block2.aoi: MkII Rail clamping block, designed for 8mm rails.|thumb]]
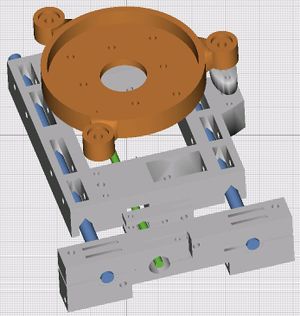
- How the parts of the carriage correspond to the spider (orange):
- [[File:Screw-drivenLinearAxis-Carriage 1 of.stl: Carriage model - probably best oriented the other way up.|thumb]]
- [[File:Screw-drivenLinearAxis-linkage 2 of.stl: Linkage joining the carriage to the driving threaded rod.|thumb]]
- [[File:Screw-drivenLinearAxis-nut holder 3 of.stl: Nut holder. Attaches vertical axis.|thumb]]
- [[File:Screw-drivenLinearAxis-carriage2.aoi: Carriage ArtOfIllusion source file, complete with workings.|thumb]]


