RepRapPro Mendel power supply
|
English • العربية • български • català • čeština • Deutsch • Ελληνικά • español • فارسی • français • hrvatski • magyar • italiano • română • 日本語 • 한국어 • lietuvių • Nederlands • norsk • polski • português • русский • Türkçe • українська • 中文(中国大陆) • 中文(台灣) • עברית • azərbaycanca • |
Introduction | Frame assembly | Y axis assembly | X axis assembly | Z axis assembly | Heated bed assembly | Extruder drive assembly | Hot end assembly | Power supply | Wiring | Commissioning | Printing | Multi‑colour/multi‑materials | Colour Printing - Slic3r | Colour Printing - RepRapPro Slicer | Maintenance | Troubleshooting | Improvements
| A notice about these instructions! |
|
Since 1st April 2013, the RepRapPro Mendel has been superseded by the RepRapPro Tricolour and Mono Mendel. |
Contents
Goal
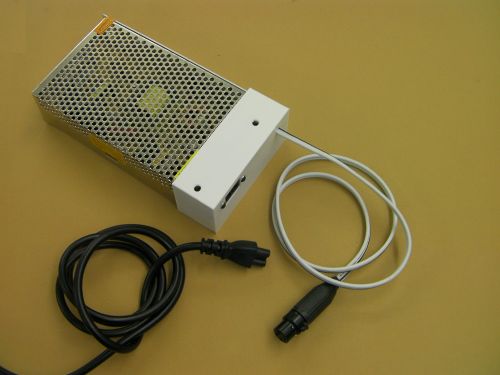
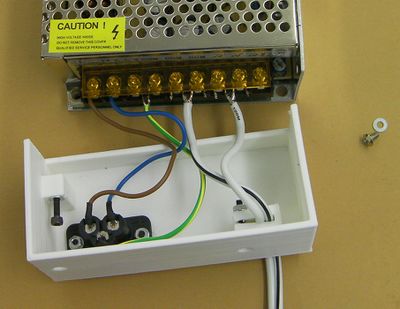
By the end of this step your power supply should look like this:
Safety
RepRapPro Mendel works entirely at low voltage, and there is no danger in putting a finger on any part of the circuitry on the machine itself (though remember some parts are hot).
But the power supply necessarily involves a few mains wires. Mains will kill you if you touch it. So don't.
There are six soldered mains connections in the power supply. If you are not sure about mains wiring, or your soldering is blobby, prone to dry joints, or in any way un-neat, then get someone who knows what they are doing to help you with the work on this page.
When doing all wiring make sure that connections have no stray wire filaments that may short on neighbouring parts.
Bare the ends of wires, twist them, check for a neat twist with no strays, and then finally tin them.
This is important on the next page (wiring up the machine), but it is really important for wiring the power supply here. The power supply works with both large voltages and large currents, and so careful, tidy work is essential.
Tools
You will need the following tools:
- M3 Allen key
- Cross-head screwdriver
- Tweezers
- Multimeter
- Soldering iron and solder
Parts
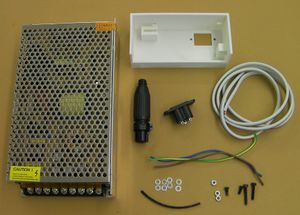
Note that sometimes the three mains wires are supplied as a cut length of mains flex. Simply pull the three wires from the outer coating.
The 20A wire is the piece you have left over from building the heated bed. Take a look at the wiring page and run it along the route it will take from the XLR connector to the controller board. Cut off a piece that is a little too long for that job (you don't want to find it's too short...), and use the remainder for the power supply.
Mains voltage
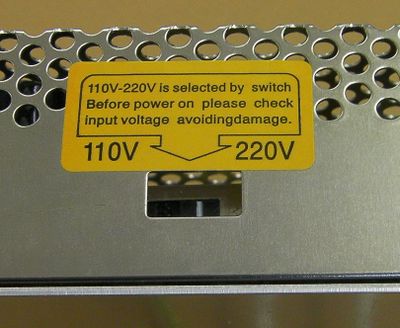
Set the mains voltage for your country. The switch, shown above, is set to 220 volts when the power supply is shipped. This is the fail-safe setting: if you plug the supply into a lower mains voltage it won't work properly, but it will do no harm.
If your country has mains at 110 volts, flip the switch.
Some power supplies are universal - they are designed to work with any mains voltage found in the world. Read the label. For universal supplies there is no switch to set.
Construction
Step 1: Initial wiring
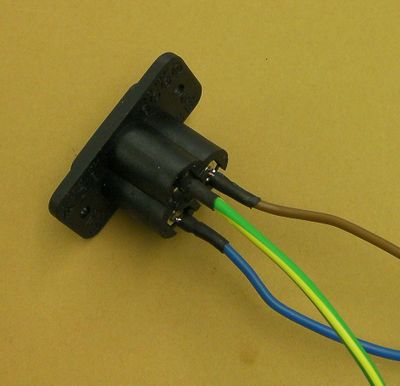
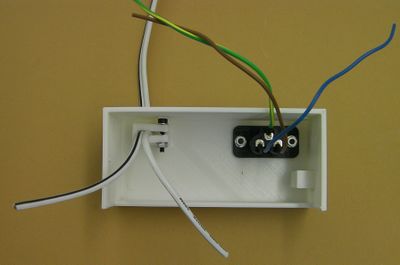
Start by soldering the mains wires onto the panel-mounting plug. The picture above shows European-convention wiring colours: Brown=Live, Blue=Neutral, and Green-yellow=Ground-Earth. The back of the plug has L, N and the symbol for Ground embossed next to the appropriate connection.
Different countries have different conventions on this, of course. The best way to get things right is to connect your mains wire into this plug but not to the mains. Then use your meter to check which terminals on the plug the live and neutral pins on the end of the lead that will plug into the wall socket go to.
When you have soldered the short wires, insulate your joints with short lengths of heatshrink.
Attach the mains plug to the printed panel with the two short screws, two nuts and four washers. You may find that the holes in the plug are slightly undersized (though the specification says 3mm). This does not matter: screw the screws in and use them to cut threads in the plastic - this will give a more secure construction. Then put the washers and nuts on the back.
Put the thick low-voltage wire through its cable grip so it projects by about 100mm. Secure the grip with the 16mm screw, two washers and a nut. Getting the washer under the screw head in is a bit fiddly - you will probably have to use tweezers.
Don't tighten the grip excessively. Just do the screw up enough to secure the cable so it can't slip.
Split the low-voltage wire into two leads.
Step 2: Connect the power supply
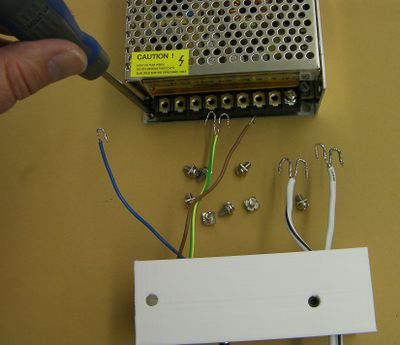
Remove all the contact screws from the power supply except the one on the extreme right in the picture.
Then remove the screw that holds the case together (where the screwdriver in the picture is). Set that aside for use later.
Next, strip, twist and bend the wires. Check lengths and fit before you tin.
For the live and neutral: form the ends into a U that will fit in the connector and be secured by one of the screws.
For the Ground wire and the two fat low-voltage wires, split the filaments of each end into two equal bundles, twist those separately, then form each of them into a U that will fit in the connector and be secured by one of the screws.
When you are happy that everything fits neatly, tin all the ends.
Screw the Live, Neutral, and one leg of the Ground wire to the labelled connectors.
Screw the other leg of the Ground wire to the COM or -V terminal next to Ground. This is important: it is the connection that earths all the wiring in your machine.
Screw the two Us of the low-voltage wire with the stripe into the two other COM or -V connections.
Screw the two Us of the low-voltage wire with no stripe into the two +V connections.
If the tail ends of the Us stick out, trim them with side-cutters. Take care where the cut pieces go - you don't want them shorting out parts of the power supply.
Finally put the 20mm screw with a washer under its head into the hole in the block on the left as shown and attach the cover to the power supply.
Take care to tuck the wires neatly inside. You may have to flatten the mains wires so that they lie in the plane of the back face of the plug.
Use the 20mm screw to secure the cover where you removed the short cover screw before. Use that short cover screw with a washer to secure the other end of the cover to the threded hole in the power supply case.
Step 3: The XLR socket
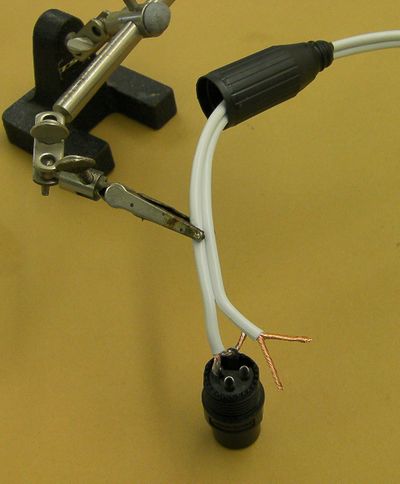
Put the shell of the XLR connector onto the low-voltage wire.
The picture shows the ground wire connected, and the +12V wires ready to connect.
Separate and strip the ends. Once more divide the ends into two equal bundles, then twist each bundle.
Pin numbers are marked on the back of the socket.
The Ground wire (with the black stripe) goes to Pin 1 of the socket and the tab on the outer case.
The +12V wire (plain white - no stripe) goes to pins 2 and 3.
Push the twisted bundle down the connector (the hole goes quite deep). Give each one a good generous amount of solder.
For the Ground/Tab connection, simply push the wire through and solder it as shown in the picture. Then cut off the excess wire with side cutters.
Screw the shell onto the socket. Hold the wire still so that the turning action doesn't twist it up inside.
Step 4: Testing
If any of these tests don't work, stop, unplug everything, and find the fault before going on.
Switch your meter to measure resistance.
Plug the mains wire into the power supply but not into the mains yet.
Important: Check the resistance between the Ground pin on the mains plug and the metal case of the supply. This should be 0 ohms.
Check the resistance between the Ground pin on the mains plug and Pin 1 of the XLR socket. This should be 0 ohms.
Check the resistances between the case and the Live and Neutral pins of the plug. These should be infinite.
Switch your meter to measure DC voltage.
Put the Ground or Common meter probe in Pin 1 of the XLR socket and the Volts-Ohms-Amps probe into Pin 3.
Plug the mains lead into a socket and switch on the power.
The meter should read +12V plus or minus about 0.3 volts.
