Prusa Mendel/pt
|
English • العربية • български • català • čeština • Deutsch • Ελληνικά • español • فارسی • français • hrvatski • magyar • italiano • română • 日本語 • 한국어 • lietuvių • Nederlands • norsk • polski • português • русский • Türkçe • українська • 中文(中国大陆) • 中文(台灣) • עברית • azərbaycanca • |
Release status: working
Contents
Introdução
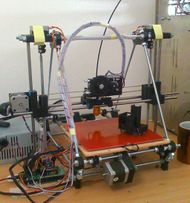
A Prusa Mendel Iteration 2 é uma melhoria da Prusa Mendel (iteration 1), lançada em Novembro de 2011. Esta versão é antecedente à (i3) que pode ser achada aqui: Prusa i3
Dimensões
As dimensões externas da Prusa Mendel Iteration 2 são aproximadamente 44x47x37 cm.
Principais Melhorias
A Baixo uma lista das principais melhorias feitas sobre a Prusa Mendel Iteration 1
- Mais peças são feitas para serem de encaixe.
- Encaixes para buchas ou rolamentos lineares nos carros.
- Armadilhas para porca foram adicionados às peças que usam parafusos M3 ( ex: final de curso titulares etc.).
- A segunda base para impressão foi removida pois usando a heatbed, esta já é a segunda base.
- Correias trocadas para GT2 - recomenda-se comprar polias usinadas.
- A maioria dos parafusos M4 foram alteradas para M3s.
- A guia de correia, de plástico impresso, foi concebida para substituir as grandes arruelas M8x30.
- O Grampo para as correias foi redesenhado.
Desenvolvimento
O desenvolvimento da Prusa Mendel está alocado no github: http://github.com/prusajr/PrusaMendel.
História
- Iteration 2 announcement
- This page de Gary Hodgson, mostra as diferenças entre o modelo Prusa Mendel original e a Iteration 2
Partes Impressas
Imprimindo a Prusa Mendel Iteration 2
Faça o download das partes no link do github, então imprima as partes que precisa. Note que a pasta "metric-prusa" contem as partes para uso de bucha nos eixos, já na pasta "metric-prusa-lm8uu" contém os encaixes para os rolamentos. Não cometa o desatino de imprimir os encaixes errados, pois terá que imprimi-los novamente.
O Greg Frost Accessible Extruder contido no repositório não se encaixa bem aos parafusos! Faça o download e imprima do site [Thingiverse Greg's Hinged Accesible Extruder]
Partes
O [Repositorio Github] para a Iteration 2 possui todos os arquivos STL que você precisa, em ordem para fazer a impressora. Rode o "generate-metric.bat" (ou um dos arquivos .bat para os rolamentos lineares) e isto irá gerar os arquivos STL que você precisa. Você vai precisar do OpenSCAD instalado, e indicar o caminho dos arquivos.
Abaixo a lista do que você vai precisar imprimir.
Partes para o Wade's extruder inclusas nos STLs da Iteration 2:
As partes inclusas no repositorio Github possui as dimensões erradas para as porcas! Faça o download da versão corrigida em [Thingiverse Greg's Hinged Accesible Extruder]
| Quantity | STL file | Picture |
|---|---|---|
| 1 | wade.stl | |
| 1 | wade-big.stl | |
| 1 | wade-small.stl | |
Partes Não Impressas
Derivada da lista de peças feita por Kliment
| Quantity | Description | Comments |
|---|---|---|
| Fasteners | ||
| 100 | M8 nut | Easier to buy a box of 100, spares are handy. Enough for Wade's extruder too |
| 100 | M8 washer | Easier to buy a box of 100, spares are handy. Enough for Wade's extruder too |
| 50 | M3×20 bolt | Enough for Wade's extruder too |
| 50 | M3 nut - 5.5mm wide to fit nut traps | Enough for Wade's extruder too |
| 50 | M3 washer | Enough for Wade's extruder too |
| 6 | M3x10 bolt | |
| 2 | M3x8 grub (a.k.a. set) screw | |
| 1 | M8x50 grub (a.k.a. set) screw OR 50 mm length of threaded M8 rod | x end idler to hold belt bearing |
| 6 | M8x30mm fender washer | Used during assembly instructions, but not necessary if bearing-guide.stl is used instead - make sure your bearings can fit into bearing-guide.stl, some printers are not precise enough for printing bearing guides, can also use 5/16 x 1-1/4in fender washers |
| Bearings | ||
| 10 | LM8UU (Asia) or LME8UU (US, Europe) linear bearings OR 8mmx25mm brass bushings |
If using linear bearings, don't cut costs here. Cheap ones can damage the smooth rods. (check plastic parts, in some cases could be required 11 pieces, (for example, if your X carriage has a spot for 4 bearings). When in doubt, just purchase 11 and you'll have an extra if you don't need it |
| 3 | 608 "roller skate" bearings | "6082RS" for sealed, "608ZZ" for shielded. Again, don't skimp. |
| Threaded Rods - threaded lengths can all be cut from 6x1m lengths of M8 threaded rod ( 370 + 370 +210 ) * 2, ( 294 + 294 + 370 ) * 2, 440 + 440 , 440 | ||
| 6 | 370mm M8 threaded rod | Three per side |
| 4 | 294mm M8 threaded rod | Front/rear. Can use 300mm too |
| 3 | 440mm M8 threaded rod | Top/Bottom. Can use 450m too |
| 2 | 210mm M8 threaded rod | z-axis lead screws. Can use 300mm too |
| Smooth Rods - smooth lengths can all be cut from 3x1m lengths of O1 tool steel (350 + 350), (405 + 405), (420 + 420) | ||
| 2 | 350mm 8mm smooth rod | |
| 2 | 405mm 8mm smooth rod | |
| 2 | 420mm 8mm smooth rod | |
| Belts | ||
| 1 | 840mm GT2 toothed belt | T2.5 can be used as well. Be sure to match the pulleys. If you really want you can use T5 but it's not advised. |
| 1 | 900mm GT2 toothed belt | T2.5 can be used as well. Be sure to match the pulleys. If you really want you can use T5 but it's not advised. |
| 2 | 16-tooth pulleys to fit GT2 belts | Can be 12-tooth, but 16 is advised for less backlash. Bore diameter should be 5mm. |
| Other | ||
| 2 | 1.5cm vinyl tubing, 6.35mm OD 4.32mm ID (3cm total) | Used to attach motors to the Z axis threaded rods. Can be found at most hardware stores, typically used in toilets to connect refill tube to outlet. |
| 1 | 140x225x6mm OR 225x225x6mm thick MDF/flat wood | Used as the bottom print bed, 225x225 can be used to directly mount a MK1/MK2 heat bed |
| 1 | Glass surface or mirror | Used as the top print bed. Small, cheap Ikea mirrors work well cut to 200x200mm if using a MK2 |
Se for usar o Wade's extruder incluso nos STLs:
| Quantity | Description | Comments |
|---|---|---|
| Fasteners | ||
| 4 | M8 washers | Included in count above |
| 2 | M8 nuts | Included in count above |
| 6 | M3 nuts | Included in count above |
| 3 | M3x10 bolts | |
| 3 | M3x40 bolts | |
| 1 | M3x8 grub screw | |
| 1 | M8x20 grub screw OR 20 mm length of M8 threaded rod | Use this in the idler to hold bearing, a cut piece of threaded rod is much more cost effective |
| 1 | M8x50 hobbed bolt | |
| Bearings | ||
| 3 | 608 "roller skate" bearings | "6082RS" for sealed, "608ZZ" for shielded. |
Modelo Montado
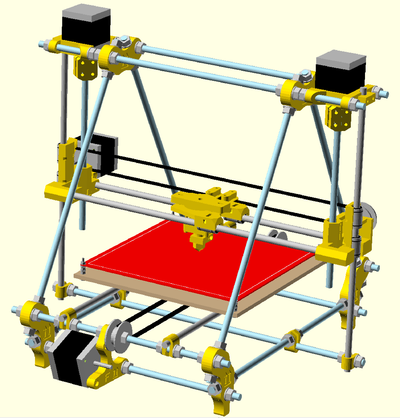
Aqui um modelo "montado" da Prusa Mendel IT2 feito em OpenSCAD (usando a variação de eixo X um pouco maior, barras lisas de (412mm) e 4 porcas e 4 arruelas extras no topo (ao longo da montagem do motor z, permitindo assim ajuste.)):
http://www.thingiverse.com/thing:356386
Eletrônica
Motores de passo
A Prusa iteration 2 usa 5 motores de passo NEMA17, incluindo o extrusor. Dois destes motores, para o eixo Z, são conectados ao mesmo driver de motor, que são normalmente ligados em paralelo, mas alguns construtores os liga em série, para que cada motor receba a mesma amperagem, (neste caso as resistências não são exatamente as mesmas). Se for usar o extrusor Wade's Extruder, o motor de passo precisa de um torque mínimo segurando de 40Ncm (0.4Nm ou 57 Oz-in equivalente a 4,104 Kg/cm). Mais informações na pagina de Stepper Motor.
Controladores
Para qualquer controlador funcionar com a Prusa iteration 2. Características Necessárias
- 4 Motores de passo
- 1 input para o thermistor
- 1 para o aquecedor do extrusor.
- opcional outro par de input e output (thermistor/aquecedor) para a cama quente. escolha o melhor para sua impressora é mais uma questão de gosto. Para comparações veja List of electronics, Comparison of Electronics e Alternative Electronics. Lembre que vai precisar de uma fonte de computador (PSU), não inclusa na maioria dos projetos eletrônicos. Lembre também que alguns esquemas (RAMPS principalmente) precisam de um Arduino.
Extrusor
The extruder included in the Prusa Mendel i2 STL files is [Thingiverse Greg's Hinged Accesible Extruder]. If planning on using a different extruder, ensure that it is compatible with the X-carriage that you have printed.
In terms of hot end, many recommend a J-head hot end as they are very common and easy to work with. It is HIGHLY RECOMMENDED that you purchase an official j-head, as the Chinese manufactured j-heads have issues with tolerances and reliability.
Remember that a J-head will require some sort of aluminum/printed assembly to attach to the extruder.
More information can be found here: Extruder
Cama Quente
Se você planeja usar uma cama quente, peneje sua base de suporte para sustentar a cama quente. Por exemplo, se você planeja usar a serie MK2 de cama quente, sua base de sustentação precisa ser cortada com 225x225 mm, não mais que isso para uma montagem "limpa".
Atenção: tente não usar acrilico para sustentar a cama quente, ele irá deformar com o calor. Alumínio grosso de 3mm ou MDF de 6mm ou compensado de 6mm extremamente liso e plano, são recomendados - Se não conseguir achar o alumínio de 3mm ou o MDF de 6mm opte por um pelo compensado plano e liso. Compensado de bétula pode ser usado por um tempo.
mais informações aqui: Heated Bed

