LaserCut Mendel
This page is a development stub. Please enhance this page by adding information, cad files, nice big images, and well structured data!
Release status: unknown

| Description | LaserCut Mendel
|
| License | |
| Author | |
| Contributors | |
| Based-on | |
| Categories | |
| CAD Models | |
| External Link |
This Repstrap is cut from three different thicknesses of plywood, you may cut your own (if you have access to a laser cutter) or, you may buy a kit from TechZoneCommunications.com llc.
*** Please note, until the instructions are posted here in the wiki, there will be no support for this project, if you choose to use the files before the instructions are posted, you are on your own, until that time!This page is the home page for this project, you should be able to find links to all files, instructions and videos needed to create a LaserCut Mendel of your own.
Contents

Genereal Description
The LaserCut Mendel was developed by TechZoneCommunications.com llc. It was originally intended to be a 1:1 replacement for printed parts, however due the overly complex post-processing which would have been required, it was re-designed to be a replacement One Axis at a time. In other words, you should be able to replace the LaserCut parts for any single axis with printed parts for that same axis and it should work.
If you are cutting your own, you need to know that there is some ADVANCED post-processing of parts with a router table and drill press. You will also need to build some jigs to perform the post-processing accurately.
The creation of the files represents over a hundred hours of work, so if you are not purchasing any items from TechZone, please consider making a donation to them so that they can continue developing and providing technical support for RepRap
Description of Differences
Although the frame is the same, there have been some notable differences.
1. Hardware differences: The LaserCut Mendel uses far fewer m4X40 bolts (it uses less bolts in general), but it uses more of the m4X16 bolts. There are also 2 fewer bearings on the Y axis - technically you should be able to leave these same bearings out of the original Mendel and it would work and perform fine. We also use far fewer m3 bolts. We also need 8 pieces of 40mm X m4 studding
2. X Axis We have reduced the number of parts, and combined pieces, in order to simplify the assembly out of sheet goods. We also changed the way the bearings mount up, they now rely on the "spring" capabilities of the plywood to apply pressure to the smooth rods (we have done this on all the axis).
3. Y Axis The bearing mounts have been changed here (similar to the other axis) the "Frog" plate has been altered significantly to accommodate the new bearing mounts- if you intend to convert this machine to a true mendel, you will need a new "original" frog plate.
4. Z Axis The Z Axis is probably the least changed, but requires the most post-processing of cut pieces.
5. Frame I mention the frame here so that no one thinks I forgot to mention it... It is relatively unchanged, and the pieces should be a near identical 1:1 replacement
Forum thread
For support, questions, and ideas use this link: http://dev.forums.reprap.org/ (Sebastien, could we start a new thread for this project - how do we do this? or do you prefer it be placed in with another existing one?)
Assembly Overview
Depending upon how you create/acquire your LaserCut Pieces, there are several major Steps to create your RepRap.
1. Aquisition of parts. Information on all the parts needed to build a LaserCut Mendel Repstrap, what to get, where to get them, or how to make them.
2. Raw LaserCut parts need a fair bit of post processing, with clamps, glue, a drill press and a router table - this makes them ready to assemble.
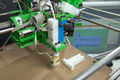
3. Ready To assemble part need General assembly into the device shown at the beginning of this wiki article.
5. Print Something!
Related Projects
Gen 3 electronics TechZone Remix New Example. LaserCut geared extruder Another Example .
Source Files
Downloads
- File:LaserCutFiles.zip This is all three of the following files in one zip.
- File:3-8inLaserCutSheet.zip
- File:1-4inLaserCutSheet.zip
- File:1-8inLaserCutSheet.zip
Image Example
Photos and Drawings

Captioned
Links can be put in captions.

More Examples
Huge Image

(This page was made using the wiki page Example as a model.)