PortaPrusa Build Manual
|
English • العربية • български • català • čeština • Deutsch • Ελληνικά • español • فارسی • français • hrvatski • magyar • italiano • română • 日本語 • 한국어 • lietuvių • Nederlands • norsk • polski • português • русский • Türkçe • українська • 中文(中国大陆) • 中文(台灣) • עברית • azərbaycanca • |
Contents
About Build Manual
This is my personal build log, I will be posting regular updates as I make progress.
Still To Be Printed Parts
There are a few parts that I am considering making, such as pla bushings and a bar to lock the box open, but all existing files have been printed :)
Printed Parts
These are Completed Prints
| Quantity | STL file | Comments | Picture |
|---|---|---|---|
| 1 | Z-Bottom-Large.stl | Done! | 
|
| 1 | X-Big.stl | Done! | 
|
| 1 | X-Small.stl | Done! | 
|
| 1 | Extruder-Main-2.stl | Done! | 
|
| 4 | M8-Mount.stl | Done! |    
|
| 1 | M8-Mount-Limit.stl | Done! | 
|
| 4 | M4-Mount.stl | Done! |    
|
| 1 | Y-Motor.stl | Done! | 
|
| 2 | Idle-Gear.stl | Done! | 
|
| 2 | Z-Top.stl | Done! |  
|
| 1 | Z-Bottom-Small.stl | Done! | 
|
| 1 | Extruder-Arm.stl | Done! | 
|
| 1 | Extruder-Clamp.stl | Done! | 
|
| 1 | Extruder-Plug.stl | Done! | 
|
| 1 | Y-Idle.stl | Done! | 
|
| 1 | Bed-BeltMount.stl | Done! | 
|
| 1 | Bed-Clamp.stl | One done, 1 to go |  
|
| 2 | Bed-Slide.stl | Done! |  
|
| 2 | Box-Pivot.stl | Done! | 
|
| 1 | Endstop-Mount.stl | Done! | 
|
| 2 | Drive-Gear.stl | Done! |  
|
Laser Cut Parts
These Parts need to be laser cut.
- The Wooden box is made from '1/4 in' (.2 in) or 5mm sanded ply.
- You will need a 2ft x 3ft board to do it all. (usually sold in 4 ft sections)
- There is also a Piece made from acrylic, but I haven't designed it yet, so that will have to be put on hold.
| Quantity | STL file | Comments | Picture |
|---|---|---|---|
| 5mm Wood | |||
| 1 | Front.dxf | The big sheet | 
|
| 1 | Back.dxf | The other big sheet | 
|
| 2 | Left.dxf | Side of box | |
| 2 | Right.dxf | Side of box | |
| 1 | Top.dxf | Top of box | |
| 1 | Bottom.dxf | Bottom of box | |
| 1 | Plug.dxf | Fills hole | |
| Acrylic | |||
| 1 | bedMount.dxf | Goes under heated bed | |
Hardware
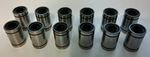
- Linear Bearings -
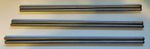
- Smooth Rod -

Electronics
Here are some of the electronics I'm using.
- Extruder -
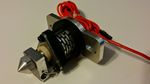 I'm not sure what this extruder is called, will try to update when I figure that out.
 - Controller -
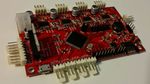 This printrboard was made by geeetech, I got it on sale for a great price! :)
 - Motors -
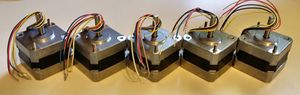 I'm using 5 compact Nema 17 stepper motors. Most Nema17s are pretty similar, but there are some differences, mainly in the wires.


Building Guide
Step One
The first thing you need to do is insert the linear bearings into their respective 3d parts.

Step Two
We will now mount the Z-motors to their mounts, and attach those to the frame.
Vitamins - 3x M3 bolts, nuts
Note - my motors came with bolts, yours may not.
![]()

Step Three
It's time to assemble the X carriage.
Note - I had to drill out some holes for the smooth rods to fit.
![]()
Step Four
Now we will put together the sliding mechanism.
Vitamins - 8x M3 bolts, nuts; a couple bolts and washers for pivots.
