User:Rsol
2/7/2014
Contents
Changes to Extruder
To begin, one needs to change the position of the MDF printed block seperate the prusa nozzle from the MakerGear Motor support. If not heat with travel through convection and begin morfing the ABS motor support. I need to cut the MDF piece smaller to correctly place it under the X-Carriage Mount.
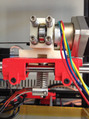
Caption 1
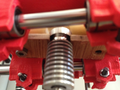
Caption 2


Changes in Marlin
Max Temp of Extruder Must be set to 350 I like to keep the extruder power at Max as I find that halfing power dosn't allow the extruder to reach the set temperature. Even at max power I reach degress less than desired.Therefore:
- define PID_MAX 256 // limits current to nozzle; 256=full current
For the inability to reach set temperature I need to change the temperature as to which the printer feels it should start printing. Therefore, since the stainless steel can't hold temperature as well as the teflon you need to allow it to have a range of tempartures. I say 10- 15 degress. Therefore:
- definte TEMP_HYSTERSIS 15
- definte TEMP_WINDOW 15
Further it is very important to get the printer printing once the polycarbante is in head to make sure the filaments flows. Although no fan is needed the polycarbonate will reach its glass transistion temperature if you allow it to sit in the nozzle. Thus, it is important to keep the filament flowing. The small fan placed correctly, but I have yet to attempt this solution. Therefore, to begin printing immediately:
- definte TEMP_RESDENCY_TIME 1
Note: Make sure you have the correct teperatures when your going to start printing, such as having the bed temperature over desired and the extruder temperature between 10-15 from target. Because if not the Pronterface will stall and you don't want the PC sitting in the nozzle for to long. Cura Setting Temperature Setting SMALL PRINTS(50mmx50mmx50mm)
Printing Temperature
I set my pronterface and Cura to 310 knowing that the nozzle can't reach the set temperature and will be 10 degrees less than desired. Printing Temperature(C): 310
Bed Temperature
I think you want it warm enough that the plastic sticks to the ABS glue. However, note you don't want it to warm in that the your ABS/PLA support pieces reach glass transition temperature. Some site will recommend a bed temp of 100C or 120C. At this temperature though my support pieces started morfing. Bed Temperature(C): 85
Print Speed
What is very important with print speed is to make sure that your printer is not skipping. Once it skips plastic will agrregate at the nozzle and this aggregation will prefer to stick to the extruder rather the previous layer as the print continues.
Print Speed: 45 (Both inital layer and normal print), but ultimately speeds depend on your printer** Layer Height The usual is 0.3. I find however, that the PC is a fairly thick material and that one of the necessities is to avoid the previous layer from sticking to the nozzle. Therefore increase the layer height by alittle help assure you get smooth layers. Layer Heigh(mm): 0.4 Filament Diameter Getting the filament to continously flow to assure that glass transition temperature is not reach is one of the particulars of PC as stated before. Therefore, increase flow to assure that the plastic continues smoothly is a plus. Flow(%): 130
Polycarbonate Bed Material
Two layers of Kapton tape are required. One of the things of polycarbonate is as it cool it likes to bendd in on itself and since it is such a strong material it takes the ground tape with it as well. Therefore, by double layer the Kapton you can assure a more even print over time. The other necessity is ABS Glue. I don't know why but it works like magic. Pour the ABS glue, spread with a brush and finally, sand it down with a sander. By sanding you will be assuring that there is much more even surface, especially when bubble are created from acetome evaporation. NOTE: By letting the polycarbonate cool after a print you will not have to reapply the ABS glue. If you get too impatient and try ripping off the PC part before the bed temperature reaches a cool enough temperature you will take the ABS glue with it and have to reapply. 50C is usually a good temperature to start trying. Therefore: 2 Layers of Kapton Tape ABS Glue - ABS Pieces + Acetone in a nail polish container.
Starting Z Height
Want your initial Z zero to be about .2 mm high. You don't want it touch the bed but a bit of height helps the plastic flow.
No Brim
I removed the Brim setting because the Brim line would not stick well in the print and interfere with the main part intial line. Once interefered it destroys the inital layer.
Large Prints (150x150x150 particularly boxes)
One of the challenges of large prints especially when creating square designs is that corners tend to cool faster then walls. Therefore, it is best to design things with oval structure and round edges than with sharp edges. I also believe that over a certain period of time like 3-4 hours although you might have plastic flowing the nozzle temperature at the top will reach a sufficient temperature that polycarbonate glass transition temperature will be reached. This will eventually stop your flow. To avoid this problem I hypothesize that by placing a fan one can continously print with out worry for longer periods of time. On larege prints I also hypothesize that a hotter bed temperature would be recommended and increase print speeds. The cooling between layer happens more easily since the nozzle has to go all the way aorund from its original point. The plastic will not be as hot as it should be if your nozzle is not travelling fast enough because polycarbonate does solidify quickly. More experimentation is required to create ideal settings for large prints.