TobyBorlandOriginal
Contents
Assembly of a Toby Borland Original PlyRap
Introduction
These are the build instructions for a plywood Version 1.0 Darwin RepRap. This is a duplicate of the one exhibited at the Science Museum (London, England) in conjunction with SMARTlab. Toby was originally working to fairly tight deadlines and the documentation lagged the actual build. This document is aimed at contributing to that documentation and complements the CAD files which can be found at Sourceforge in the CVS repository. As this documentation is written after the fact and I am in many ways catching up to the detailed work that went before, any errors and mistakes are likely to be mine. Feedback and observations are welcome.
Construction Hints and Tips
Working with Plywood
Plywood whilst being an engineered material shares a whole bundle of features with the wood it was made from. Key features to note, then work with and around are :-
- Dimensional stability
- Dimensional Precision
- Absorbs Water
- Glueing
- Filling
The components in this design are made mostly from the same thickness of plywood. This means that where a component needs to be of a greater thickness several pieces of the plywood are glued together to achieve this. This technique is known as lamination and can create parts with great strength if a few simple rules also common to gluing wood are followed.
- Trial Assembly
- Applying Glue
- Clamping
- Work in Stages
It is worthy of note that laminating thin plywood to make thicker pieces if glued correctly will create components with greater strength than working with thicker plywood. This is due to the way plywood is constructed. The outer layers are made from "Best" wood that has a better look and greater strength than the core wood which is a lower grade filler. thicker plywood has more filler. Where as thin plywood laminations contain more "Best" wood and consequently have a greater strength.
A word to the wise, I originally intended to set off and hand cut a set of components to do this build. Toby managed to talk me out of it. Having studied the components and completed the first set of Bed Corner Brackets I now fully realize Toby's advice was sound. His design was specifically made up for laser cutting and many of the components are cut with a precision that is not possible with other tooling. The Kerf (the bit that is lost during cutting due to tool width, usually as sawdust) is so very fine with a Laser cut. Add to this the facts that the Laser burn heat seals the edges and the lack of mechanical distress to the cut edges and you can see how work this fine with a material like plywood is only really possible using laser cut pieces.
Assembling the Jigsaw Pieces into Components
Before
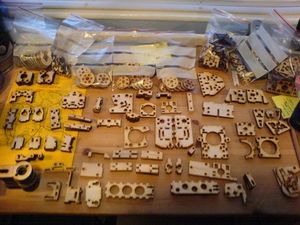
The jigsaw laid out. Before starting check that you have all the pieces by laying them out somewhere where they won't get disturbed. This will also help you easily locate the parts you need for each component as you come to assemble it.
- The pieces laid out:
Resealable plastic bags are great for keeping the more numerous components together and organizing things.
Bed Corner Bracket
After
Acknowledgments
- Toby Borland for the original PlyRap exhibited at the Science Museum (London, England), Laser Cutting, Build Photos and ongoing input.
- Vik Oliver for ongoing work on simplifying and attempting to create a reduced cost PlyRap.
- Everyone at forums.reprap.org for their contribution to this ongoing development
-- Main.AndyKirby - 10 Jul 2008
