Smartrap mini
|
English • العربية • български • català • čeština • Deutsch • Ελληνικά • español • فارسی • français • hrvatski • magyar • italiano • română • 日本語 • 한국어 • lietuvių • Nederlands • norsk • polski • português • русский • Türkçe • українська • 中文(中国大陆) • 中文(台灣) • עברית • azərbaycanca • |
Release status: working

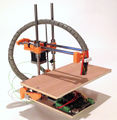
| Description | Smartrap mini is a small but strong reprap designed to be really easy to build and maintain.
|
| License | |
| Author | |
| Contributors | |
| Based-on | |
| Categories | |
| CAD Models | |
| External Link |
Note : we started an indiegogo campaign about this project , to build a batch of it and improve the model : http://www.indiegogo.com/projects/smartrap/x/5311699
Thank you for sharing it if you like it :)
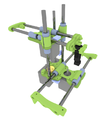
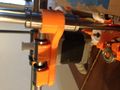
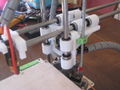
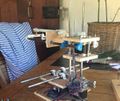
update V0.4.5 : new lm8 holders! the integrated one are really too easy to brake ( due to the printing orientation). Now we have a separated part, but more easy to print and more stable!
all come together.
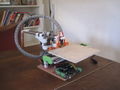
the plate_Base is smaller . extruder was turned 180 degrees.
- 045 4.png
shorter plate_x, lm8 holders and new screw on Z axis for bed levelling.
The new V0.4 updated. lm8 holders was too low and tight. Now it works great out of the box ( not so much snooze by the way ? :)
a better pic of this version!
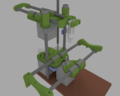
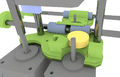
and this is the v0.4 in blender! No more plate_X_bottom. there's only 8 printed parts now :) happy.
the new simplified plate_X. in V0.4 it's more integrated and lm8 holder are longer, so it's more straight.
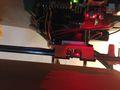
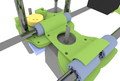
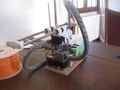
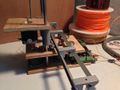
under the cover
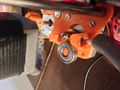
integrated direct drive.

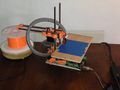
and it's printing right! on first test, i'm happy.
customized (no more plate-X_bottom) v0,3 redy to print !
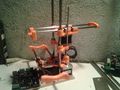
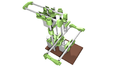
all come together :)
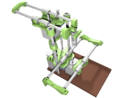
the final v0.3 blender version. now in github.
v0.3 final view from back.
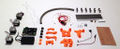
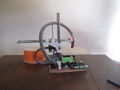
the all kit together, before assembly.

v0.3 assembly tests.
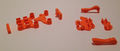
almost all printed parts need (i thought i missed some but only the z coupling missing)

v0.3 printing :)
blender preview of 0.3 : looks better and more simple. Soon updated to that version!
from back
another one
close up
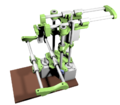
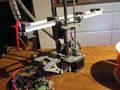
first pic of the final design. v0.1
for infos : old designs..
for infos : this was testing with original aluminium rail. very light and cool. but I couldn't make them work straight enough.
for infos : old desig..


Video of version 0.3 printing. It's a little customized version. I removed the plate_X_bottom. It was straight enough eventually. Now there's only 8 printed parts in this reprap = good!
Vision: goal
This is a new design of a reprap 3d printer. It is in the spirit of the printrbot simple , designed by Brook Drumm , one of our best designer in my opinion. I tried to make it even simpler (let's start a chalenge with Brook? :) This one is made with printed parts only so it's easy reproducible. It's also full GPL , meaning open to any business.
The goal for the Smartrap is to have the feeling of a lego assembly feasible by a 12 years old kid without complication.The Education part is very important and by building himself, the user should learn how every part is working in the all system, so he would be able to find problems and repair himself easily. In other word, the Smartrap tries to reach makers who are not real gurus like we have actually in the reprap world ( not negative meaning here, but only to help to spread the world and attire more people to this wonderful world of replicative-dIY-makers).
Other features in any order of importance are :
Real Reprap : most of the structure should be printed, so it can print itself for friends. Only the common base should be bought on special shops ( motors,hotend,controller,lm8uu,endstops).
Simple to build : I mean it! . No need for special tooling or ultra precision cut or drill or even adjustment. The final goal would be: no screw and everything come together by snap (almost).
Open source! : GPL, you can build it, sell it, make a business of it. all that is ok if you stay under the GPL licence .
Cheap as possible : fishing line, printed bushing?( not well working for me now) , cheapest electronics ( no heat bed, 4 motors, no fan).
Optionally open to experimentation : I tried so much configurations before that i should put them all online one day : Aluminium rails with 608zz, fixed axis with moving hotend, moving axis with fixed hotend..etc .
Features
Print size : from 150x150x150 to around 250x250x200. The first prototype is 200x200x150.
PLA only : It's a political decision: Even if ABS gives better results , i really don't like the fumes and the ecological impact. PLA , beeing compostable and asking for only 60 watts alime, is far more interesting to me. ( open to talk of course :)
Layer height : not really tested for now, looks like 0.2 works well.
Printed parts: 8.
Screws : M6 x2 , M3 x 16.
Non Printed parts : 6 smooth rods 8mm , 12 lm8uu, 1 M5 , 2 fishing lines 500mm , 4 nema17 motors, 1 hot-end j-head, 1 controler board , 3 mechanical endstops.
Assembly operations count : not much but not totally clear for now. Even i've already assembled 3 versions, it was still not as smooth as it should be. The main design is now ready, we will focus on details to make assembly life easier. In my point of view, it's all in details like how much place you have to put some screws, how easy is it to setup the fishing line..etc .
Practical Info; Tips and Tricks
Rod Lengths: We have for now 90mm lost on X axis and 70mm lost on Y axis. It's too much , but i'm working on it for version 0.5. So if you want 200x200 you need 290mm rods on X axis and 270mm rods on Y axis.
For Z-Rods, the current recommendation is 250mm.