RUG/Pennsylvania/State College/Printers/PSU Fab@Home

Contents
Progress
2/24/14:
We are beginning to convert the Fab@home to RAMPS 1.4 with Marlin firmware (due to its dual endstop support). The updated version of the Fab@home will be referred to by 'V2'. See Projects for details.
4/29/2012:
Fab@home is now fully operational in all axes. The next step in its developement will now be to undergo print testing, or alternatively, convert the electronics to RAMPS_1.4 with Marlin Firmware now that all electrical components have been confirmed opperational.
2011:
Pennsylvania State University (PSU) Fab@home is in operational mode and continue to be in diagnostic form. Within next week, we have an idea how to approaching for the future project.
Printer Status
| Operating Specifications | |||||||
|---|---|---|---|---|---|---|---|
| Name | Status | Design | Electronics | Firmware | Extruder | Temperature | Comments |
| Fab@Home |
Discontinued | Fab@home | LPC-H2148 Microcontroller | Model 4 | Syringe | - | - |
| Fab@Home V2 |
In-Progress | Fab@home | RAMPS_1.4 | Marlin | TBD | - | - |
PSU Fab@Home - Current Condition
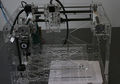
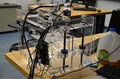
Spring 2012

Build Notes
The majority of the initial PSU Fab@home build was completed by original owner, before it donated by after prolonged difficulties regarding its operational status. An initial attempt was made to get the Fab@Home to an operational state in 2011, but this only resulted in the movement of several axes.
Having decided to reinvestigate the printer in spring 2012, we were able to drive all axes after much trouble shooting. Problems that were fixed included incorrect wiring from X-axis stepper motor to microcontroller board, a faulty 24V power supply (carefully switched to a 12V for testing purposes), disconnection of endstop ground connections, a missing endstop pullup resistor on the microcontroller, and loose pin to endstop connections.
The only problem that still exists a driver error when the power supply is disconnected before the USB. No advancements were made in the course of our trouble shooting, but this problem seems to be avoidable. Students found that one must simply be careful of the order when disconnecting these cords, and if mistakes are made, a simple restart is all that is necessary to have printer back in working order.
Electronics
We were fortune enough to have all the working electronic kits and installed as instructed. Microcontroller for Fab@home model 1:Microcontroller Olimex Philip LPC-H2148 (under ARM) Apparently, we are missing the JTAG cord which is important for flashing the microcontroller. I believe we are specifically looking for OpenOCD with firmware v4. However, the board were flash for firmware v3. Firmware module
File:Http://reprap.org/wiki/File:[email protected]
Software
Currently, PSU Fab@home is using Fab@home v.23 made by cornell university and [email protected]

![File:Http://reprap.org/wiki/File:[email protected]](/mediawiki/index.php?title=Special:Upload&wpDestFile=Http://reprap.org/wiki/File:Fab@HomeElectronicsRight.JPG)
Fab@home Software: Necessary for operation in stock form.
- FabStudio: Slicing software that generates .fab files.
- FabStudio: Slicing software that generates .fab files.
- FabInterpreter: Printer control software. Only capable of printing with .fab files.
- FabInterpreter: Printer control software. Only capable of printing with .fab files.
- svg2fab v2.0: Useful for producing 2D .Fab files for toolheads such as vinyl or foam cutters.
- svg2fab v2.0: Useful for producing 2D .Fab files for toolheads such as vinyl or foam cutters.
- Fab2GCode: Converts .fab files to .gcode files.
- Fab2GCode: Converts .fab files to .gcode files.
Printable Materials
Currently we have Acrylic Winsor Blue available for part to print. More to come on order and check out vendors for harware and material
|
|
|
|
|
|
|
|
|
Tools
Syringe Extrusion
Vinyl Cutting Tool
Diagnostic Notes
|
|
|
|
|
|
|
|
|
|
|
|
Projects
Extrusion
- Utilize syinge extrusion tool (cholocate, silicon, UV material)
- Develope and print L-bracket carriage adapter for Wade's Extruder. This would allow PSU RUG to utilize the machine's precision linear movement for prints requiring higher tolerances.