Melzi/zh tw
Contents
介紹
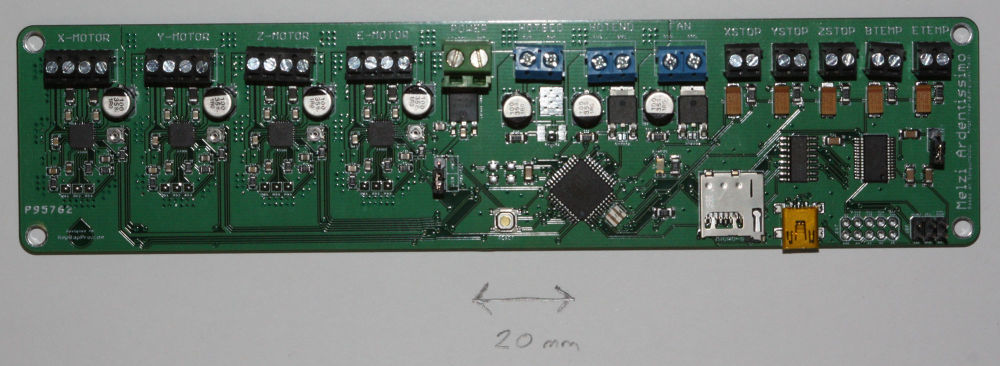
A compact all-in-one controller board for RepRaps with one extruder head, optimized for mass production.
The point of RepRap is to make itself, of course. But sometimes people just want plug-and-play RepRap electronics so they can concentrate on the other aspects of the machine, or just because they are more software or mechanics oriented than electronics oriented.
Melzi is designed to be a complete set of RepRap electronics that should be very cheap to mass produce. It was originally based on the Arduino Leonardo and is named after Francesco Melzi, who was Leonardo da Vinci's pupil.
版本
確認您的Melzi控制板版本:
| 控制板名稱 | ATMEGA微控制器 | 步進馬達驅動器 | 生產者 | 年份 |
|---|---|---|---|---|
| RepRap Melzi 2.0 | 1284P | A4982 | RepRapPro | 2012-present |
| "Melzi 2.0 1284P" (eBay hybrid) | 1284P | A4988 | Various eBay vendors | 2012-present |
| Melzi Ardentissimo 1.0 | 644P | A4988 | RepRapPro | 2011 |
Melzi Version 1.0 (Ardentissimo)
The Melzi V1 used a ATMEGA 644P microcontroller, and 4 x A4988 stepper drivers. However, problems with the routing of the fine tracks on the PCB quickly became apparent, which made them hard to make reliably. Often thermistor readings are inaccurate, or fail.
BEWARE! Some cheap online sellers still sell this version of the Melzi! See 'How to get it' list lower down this page.
Melzi 1.0/2.0 eBay Hybrid
Most listings online for "Melzi 2.0 1284P" or "Melzi V03" (as above) actually use the 1.0 board schematic, including "Melzi Ardentissimo" lettering and A4988 steppers like the 1.0, but use an ATMEGA 1284P microcontroller like the 2.0. Firmware for the 2.0 will work on these hybrids.
Melzi Version 2.0
Specification:
- Processor: ATMEGA1284P (Sanguino compatible)
- All screw connectors - no soldering
- Micro SD card slot for GCode files
- Mini USB interface
- 4 x A4982 stepper drivers
- 3 x MOSFET drivers for hot end, bed and cooling fan
- Dimensions: 210mm x 50mm x 17mm
- Weight: 70g
Source files
Version 1.0 of Melzi was developed by Joe Mosfet.
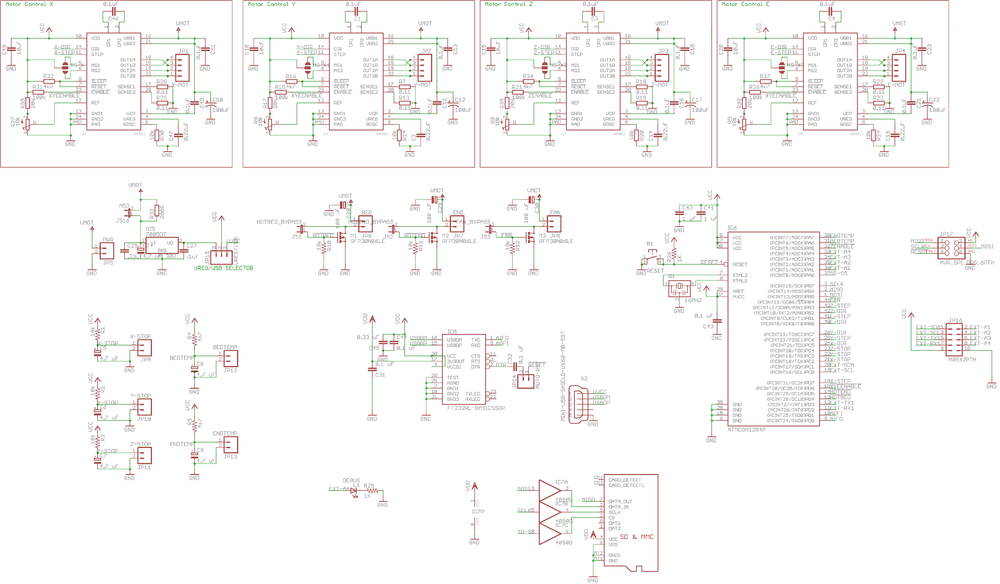
Version 2.0 of Melzi was developed from Joe Mosfet's original by RepRapPro Ltd. It can be found at: https://github.com/reprappro/melzi
Setting up Melzi
Usually, most boards are supplied with bootloader and firmware on the board, and the stepper driver currents preset. If not, read on...
Bootloader Upload
If the ATMEGA chip on your board is supplied blank, or you have had to replace the chip on your Melzi (for example, if you have short circuited the ATMEGA chip), you will need to flash/burn a bootloader onto the chip.
To replace the Atmel ATMEGA1284P chip on the Melzi, this is the technique RepRapPro uses:
- Remove old Atmel ATMEGA1284P chip - we find a hot air soldering iron is easiest; be careful not to overheat the crystal that is right next to the chip. You can heat it up in a solder oven, but be careful not to nudge other components.
- Solder on new chip - make sure it is the right way around! Use a flux pen to put plenty of flux on the board first, then solder the chip in place. You can do this with a fine tipped soldering iron, hot air soldering iron, or solder oven.
- Check there are not bridges on the pins with a strong magnifying glass or microscope
To upload the bootloader:
- The chip comes blank; you will need to flash/burn a bootloader onto the chip. When it's blank, it can't even talk via USB, only via the ISP pins on the board.
- To burn the bootloader, you will need an AVR programmer, like http://www.atmel.com/tools/AVRISPMKII.aspx This is the official one, and quite expensive, but cheaper ones are available on ebay. Check that you get one that is compatible with ATMEGA1284P chip; the USBtinyISP does NOT work with these chips.
- Download the latest version of Arduino IDE software (at time of writing 1.0.5) from http://arduino.cc/en/Main/Software
- Make sure you download the latest 'Sanguino' folder from https://github.com/reprappro/Marlin and put it in your Arduino/hardware folder (there should already be other folders called 'arduino' and 'tools' in this folder)
- Connect the AVR programmer to your PC, via USB. Connect the programmer to the Melzi, via the SPI pins. Connect USB to the Melzi - it needs power from the USB.
- Open Arduino IDE. Under 'Tools | Board' menu, select 'Sanguino W/ATmega1284p 16 mhz'. From the 'Tools | Serial Port' menu, select the port your AVR Programmer is on. From 'Tools | Programmer' select your AVR Programmer type.
- From 'Tools' menu, select 'Burn Bootloader'. You may well receive an error; search the internet with the error message to troubleshoot what part isn't working properly. it mostly depends on the AVR Programmer you are using. Of course, there may also be a problem with your board...
Upload the bootloader with a Arduino UNO as ISP:
- You can burn/flash a bootloader with a Arduino UNO. The first thing is to update the ISP software into the Arduino UNO.
- Download the latest version of Arduino IDE software.
- Open Arduino IDE. Load the ISP software 'File | Examples | ArduinoISP'. Under 'Tools | Board' menu, select 'Arduino UNO'. Also select the good serial port.
- Click on the upload button to transform your Arduino UNO into an ISP programmer.
Once the Arduino UNO is an ISP programmer, one can connect it to the melzi board with 4 wires:
 * pin 1 MISO (Melzi) on pin 12 (Arduino)
 * pin 3 SCk  (Melzi) on pin 13 (Arduino)
 * pin 5 Reset(Melzi) on pin 10 (Arduino)
 * pin 4 MOSI (Melzo) on pin 11 (Arduino)
- Connect both Arduino UNO and Melzi board to your PC.(The Melzi board needs power)
- Download the latest 'Sanguino' folder and install it like describe above.
- Open Arduino IDE. Under 'Tools | Board' menu, select your card between all Sanguino. If you don't know the card, you can pick one randomly. If you have selected the wrong card, the Arduino UNO will not burn the bootloader and will give you an error.
- From the 'Tools | Serial Port' menu, select the port your Arduino UNO is on. From 'Tools | Programmer' select 'Arduino as ISP'
- If the board you selected previously wasn't the good board, you will receive an error message saying something like board id 'XX' isn't the right one, where XX is in hexadecimal. If 'XX' is 'ff', double check wires, otherwise try another board type under 'Tools | Board' menu or check on Google the board type with the 'XX' value.
Firmware Upload
There is a version of the Marlin RepRap firmware for Melzi on RepRapPro Ltd's Github repository here. It contains the extra files needed for the Arduino IDE to talk to a Sanguino (and hence to the Melzi). These also allow you to flash the bootloader using an appropriate programmer.
There are more detailed firmware instructions on the RepRapPro site here.
As an alternative to the Marlin firmware there's the Repetier firmware for the Melzi which in my case worked better than the Marlin firmware. More details about this firmware can be found here. There's also a special firmware configuration tool (v0.92) with some nice features. If you like Repetier you can donate some money.
Melzi Arduino Pin Numbers
#define X_STEP_PIN         15
#define X_DIR_PIN          21
#define X_MIN_PIN          18

#define Y_STEP_PIN         22
#define Y_DIR_PIN          23
#define Y_MIN_PIN          19

#define Z_STEP_PIN         3
#define Z_DIR_PIN          2
#define Z_MIN_PIN          20

#define E0_STEP_PIN         1
#define E0_DIR_PIN          0

#define LED_PIN            27

#define FAN_PIN            4

#define HEATER_0_PIN       13 // extruder

#define HEATER_BED_PIN     10 // bed (change to 12 for breakout pin on header)
#define X_ENABLE_PIN       14
#define Y_ENABLE_PIN       14
#define Z_ENABLE_PIN       26
#define E0_ENABLE_PIN      14

#define TEMP_0_PIN          7   // Analogue pin
#define TEMP_BED_PIN        6   // Analogue pin
#define SDSS               31

#define SLAVE_CLOCK	   16


