Aluminatus TrinityOne Build Manual
Revision as of 16:01, 20 March 2013 by MrRocketman (talk | contribs) (Added kapton heater application section)
Aluminatus TrinityOne Documentation
Assembly Helps
- Leveling and tightening everything up - Eugene B
- Leave the main gantry-to-base mounting plates loose except for a couple of screws. Keep the Z-mounts loose on the X-Carriage. Leave the upper Z-rod mounts loose. I also left the lead screw bushings on the Z-mounts loose. The whole thing was a sloppy mess. The only thing tight was the bottom rod mounts, since there is no other choice.
- Lower the X-carriage on the z-axis all of the way down.
- Roughly level or align the x-carriage to the bed or the base sheet metal top. You want the carriage to be the same z-height on both ends.
- Sequentially tighten the Z-Mounts (Lead-screw and guide rod mounts) on the X-Carriage, wiggle the x-carriage to help it "float" to its least-stress position as you start to tighten the screws. Adjust the z-height of the X-Carriage as necessary to ensure that it is level relative to the base. This positions the Z-Mounts to match the fixed position of the smooth rods.
- Raise the X-carriage to the highest position.
- Using a square and a spacer against the smooth rod. Move the main gantry until the rods are nearly perpendicular to the base.
- Tighten the main gantry.
- Either by referencing the smooth rods or by running the X-Carriage up and down against a square, tweak the perpendicularity of the Z-axis and tighten the top rod mounts. You only want to tighten the top rod mounts when the X-Carriage is at the top of it's travel.
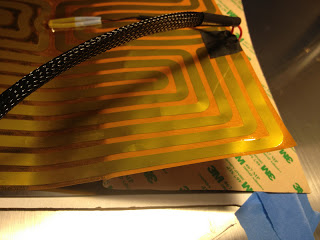
- Applying the Kapton Heater - Lukas K
- Tape down the aluminum to the desk, making sure the graphics are correctly oriented.
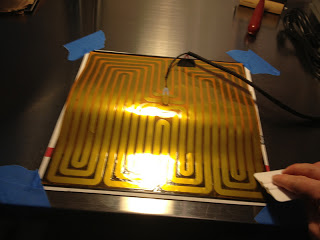
- Line up the heater, peel away the backing along the near edge, and start applying. Leave the backing partially on so you can concentrate on squeegeeing the tape down without bubbles.
- Work towards the front using the backing to hold up the sticky side. [Note you may have to peel it back slightly if you get bubbles, so it's advisable to go REALLY slow because peeling the stuff back is a real pain]
-
-