MKS BASE
| |
Not Open Source
As stated in the RepRap Wiki Policy, a wiki page that describes a product offered for sale must provide source files for that product. This page is missing at least these item(s)
There might be more items missing. If you want to help improve this design, please find source files for these missing items and upload them to this wiki, or link to the repository containing them. In accordance with the Deletion policy, an admin will review this page in about three weeks to determine if it should be removed or not. If source files are not uploaded by the proposed delete date, this page will be removed from the wiki. Proposed delete date: {{{deletedate}}} Questions about this tag can be addressed on this page's discussion page or on the Administration, Announcements, Policy forum. |
| |
This page is flagged as Advertising.
This page is found to exist for the sole purpose of Advertising, This page will eventually be removed. Reason: no sources, does not comply with lowest common denominator of opensource Proposed removal date: 19/03/2015 Please use the discussion page for any questions or comments regarding this notice
|
Release status: Working

| Description | Single board solution, Remix of Arduino mega2560 and RAMPS1.4
|
| License | |
| Author | |
| Contributors | |
| Based-on | |
| Categories | |
| CAD Models | |
| External Link |
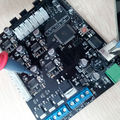
MKS BASE is a feature rich all-in-one electronics solution for Reprap and other CNC devices. It features an onboard ATmega2560. Its five motor outputs are powered by A4982 stepper drivers. The board can use the same firmware as Ramps1.4. MKS Base is designed to be flexible in the user's power source availability, allowing any power supply from 12V-24V.
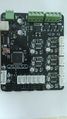
MKS Base board
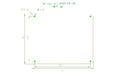
MKS Gen Size
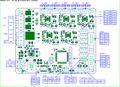
MKS Gen Pins
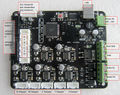
MKS Base connectors


Contents
Safety Tip
| |
Caution Once you start putting electricity into your RepRap - even at just 12 volts - you have to take basic, common sense precautions to avoid fires. |
USB Driver
MKS Base USB Driver Chip FT232RL, you can get files from ftdichip to setup driver File:Ftdi-x86.zip.
Features
- Arduino MEGA compatible Atmega2560 and FT232 processors are compatible with all RAMPS class firmware
- Firmware can use the same configuration as ramps1.4
- Easy DISPLAY + SD-CARD connector,RepRapDiscount SmartController compatible pin header on board
- 3x temperature ADC connectors for thermistors
- up to 5 motor driver with A4982
- 4x PWM capable power mosfet outputs with voltage selector for MainPower.(Bed,Extruder0,Extruder1, Fans)
- 4 layers PCB, optimize heat dissipation.
- 6x end stop connectors with power supply Xmin/Xmax/Ymin/Ymax/Zmin/Zmax
- Recoverable fuse for short-circuit protection.
Motor Driver
I = V_REF / (8 × RS) where RS = 0.1
V_REF can be checked against the picture:
Stepper A4982

MKS Base's A4982 Microstepping is 16 microsteps
Smart Controller
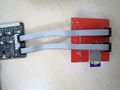
SmartController
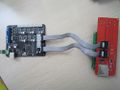
SmartController cable


MKS Base can easy use RepRapDiscount Smart Controller and RepRapDiscount Full Graphic Smart Controller. Simply connect the Smart Controller's Exp1/Exp2 to MKS Base's Exp1/Exp2.
Wiring
Wiring plan based on available information.

Firmware
This section will show you how to flash firmware onto your controller and run it with basic settings.
Software required: FTDI USB drivers, Arduino IDE, Choice of firmware (Marlin, Repetier, Sprinter, etc.), Pronterface/Printrun.
1. USB VCP Drivers (Windows only)
MKS Base uses the newer FT232 USB to UART chip and it needs the updated VCP (virtual com port) drivers from the manufacturer's website. Download the correct version for your operating system or you can get the executable version for Windows (easier). Windows Vista/7 may try to do an update to locate the proper drivers but it is recommended to install the FTDI drivers for better performance. The VCP drivers will install a COM Port on your computer for the MKS Base, you can check what port number was assigned by going to your device manager and click on Ports (COM & LPT) look for something that says "USB Serial Port (COM3)" where COM3 is your assigned port number (will vary). Remember this number as you will be using it later in configuring other software.
2. Install Arduino IDE
Download and extract the Arduino IDE from the Arduino Software page.
3. Download your firmware
Download and extract the latest Marlin firmware from the Marlin Firmware Releases page. Any of the other 8-bit AVR firmwares will also work.
4. Upload firmware
- Start the Arduino IDE.
- Connect a USB cable from your computer to the board.
- Select your board using the menu command Tools > Board > Arduino Mega 2560.
- Select the connected serial port with the menu command Tools > Serial Port > (port name). It should be pretty obvious which port is the correct one.
- Use the File > Open command to load the Marlin.ino file from your downloaded Marlin folder.
- Click the Configuration.h tab to view and edit the basic entries to get the X3 working:
Marlin 1.1.0 and newer:
#define BAUDRATE 250000 //This will work fine for the MKS Gen
#define MOTHERBOARD BOARD_MKS_BASE
#define TEMP_SENSOR_0 3 //If you have the NTC 100K
#define TEMP_SENSOR_1 0
#define TEMP_SENSOR_2 0
#define TEMP_SENSOR_BED 3 //If you have the NTC 100K
Marlin 1.0.2 and earlier treats the MKS_BASE as a generic RAMPS board:
#define MOTHERBOARD 33 //33 is for RAMPS which the MKS GEN is compatible with MOTHERBOARD 34
These are the only entries you need to get the MKS Gen running. After you flash the firmware onto the board you will be able to use most of its features. You will need to adjust several more settings in Configuration.h and Configuration_adv.h for your specific printer.
5. Flash your board with Marlin
Optionally, use the Verify button (or Sketch > Verify/Compile command) to do a test compile. This makes sure that the firmware does not contain errors but doesn't upload it to the board.
Click the Upload button (or use the Sketch > Upload command) firmware to the board. If everything goes well you'll see a "Done Uploading" message at the bottom of the Arduino window.