User:Lanthan
Contents
- 1 Background
- 2 Bootstrap generations
- 2.1 F0: Benchtop CNC router
- 2.2 F1: Pirated cupcake
- 2.3 F2: Prusa's simplified mendel
- 2.3.1 Build notes and (re)design pieces
- 2.3.1.1 10 mm microswitch holder
- 2.3.1.2 X axis reinforcement: shaft collars
- 2.3.1.3 Quick change magnetic X carriage
- 2.3.1.4 Quick change magnetic base plates
- 2.3.1.5 Adopted Nophead's half belt hack
- 2.3.1.6 Torsion box mount for the Y motor and pulley
- 2.3.1.7 Torsion box mount for the X motor and pulley
- 2.3.1.8 Adequate crossbracing to rigidify the frame along the X axis
- 2.3.1.9 Details to be solved (hopefully design those parts)
- 2.3.1 Build notes and (re)design pieces
- 2.4 To do
- 3 Lessons learned
- 4 Foreseen explorations
- 5 Design rules and optimization of parts
- 6 Other background readings and interesting links
- 7 Getting in touch
- 8 Acknowledgements
Background
Lanthan & son & cat set out their journey about robotics in early 2009. The "new" manufacturing techniques exerted a significant appeal on them.
After much lurking in forums and wikis and a steady routine of scavenging in computer and printer parts dumps, they got hold of a benchtop-cnc-router-that-would-cut-a-RepStrap-that-wold-print-a-Reprap. In other therms, they took the winded, twisted long road that offered the most varied learning opportunities.
On the other hand, there weren't so many kits or printed parts available in early 2009-2010. So they decided to cut & adapt a Cupcake, having got interested by its neat plywood assembly techniques.
Early milestones:
- Learning about Arduino ans stepper motor control
- Building a primitive eggbot from discarded printer & computer parts
- Building a cartesian plotter from discarded printer & scanner parts, sorting out a parallel port interface, and driving it with EMC
- Operating a benchtop cnc router without having the neighbours going postal
- ...
Bootstrap generations
F0: Benchtop CNC router
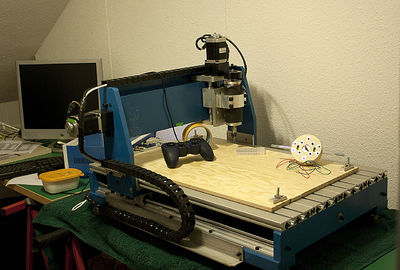
"The poor man's laser cutter", actually a very capable solution dealing with pieces up to 550 x 360 mm with (usually) better than 0.05mm precision. Unlike the lasercutter, unwieldy for large production series, but perfect for anyone whishing to learn. The decision to get one evolved from the painstaking, but ultimately successful, hand-build of a Wimshurst machine.
- Main shortcoming: noise. An incitation to cut a smaller one for PCBs.
- Main advantage: you do exactly what you want.
F1: Pirated cupcake
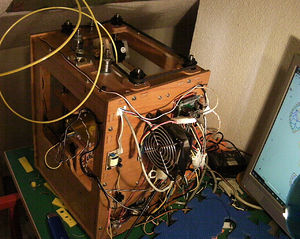
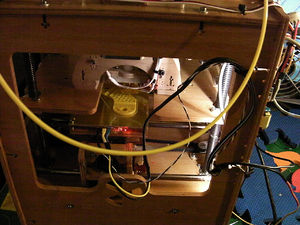
As in many cases, the work advanced episodically, was put on hold for many months due to other contingencies, and offered some opportunities for some personal interpretations research. The build was completed in summer 2011. Build details, configuration hints and links have been added to the Pirated CupCake page (will proceed with some reorganization).
While devoid of any stellar performance, and as much a musical instrument as a rapid prototyper, this has quickly turned into a reliable workhorse. Surprisingly little adjustments were needed.
Shortcomings: Like most designs around, Z axis is problematic. A complete Z rebuild with 3 x 12mm guides and LM12UU bearings is in the plans.
F2: Prusa's simplified mendel
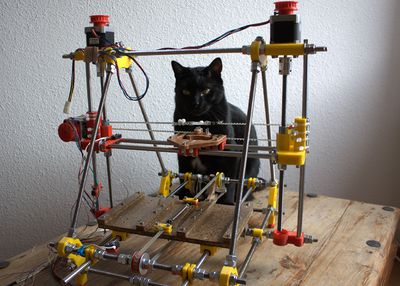
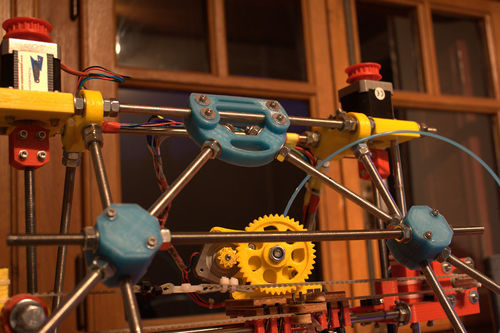
By far this was the most intense and involved build construction-wise. Very promising. Needs patience, persistance and recursivity for fine adjustements.
Kitsellers heed: Since most kits already include lasercut parts, one could imagine at least two precision lasercut/routed pieces that help get the rods in the exact positions quickly and without much fuss. From what I gather, the Orca's main attrait might be there: precision parts doubling as build guides.
I have also found that plastic saving design (for easier, cheaper reproduction) has negatively impacted on important structural parts, and have repeatedly found myself designing palliatives and replacement parts. My hope is to help improve the machine. Slightly frustrating and time consuming as a situation, but stems from the fact that us, users, and commercial sellers driving the design of pieces do not share the same priorities.
Build notes and (re)design pieces
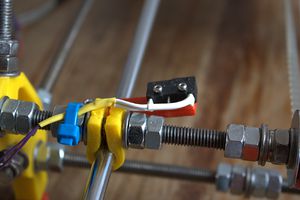
10 mm microswitch holder
Note: All due credit must be given to Adrian's who deals with 9.5mm spacing and M2.5 holes. My mod was independent of his.
M2 holes spaced 10 mm. Direct mounting of common microswitches. No additional electronics needed with the Arduino's internal pull-ups enabled.
On Thingiverse (including STL)
Files:
- Openscad
- (STL uploads currently fail on the Wiki)
X axis reinforcement: shaft collars
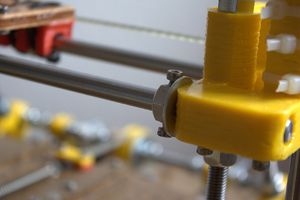
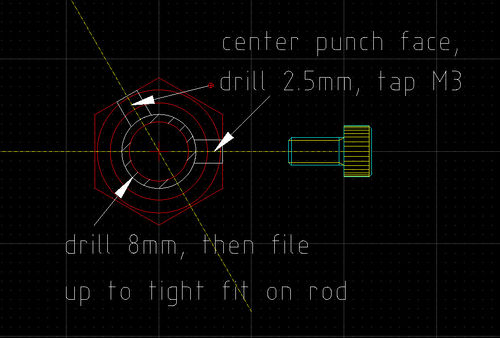
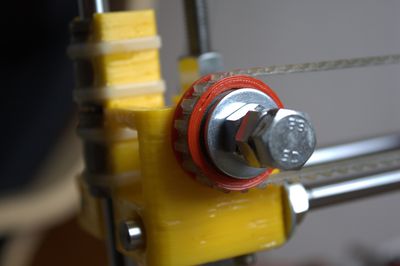
This may be a bit of pre-emptive maintenance and a pure vitamin, but one you can easily make with a drill press, M8 nuts, 8mm and 2.5 mm drills, a file, a manual punch and an M3 tap.
- The problem with the current Prusa Mendel's design: the trapped nuts on the idler and motor ends of the x axis are held by very few layers of plastic. This drastically limita the pressure one can appply to fix in place the smooth rods. There will be slippage, and frequent adjustment needed to re-tension the x axis belt. It must be happening around, no?
- The plastic solution: would be to significantly increase the number of layers under the trapped nuts, increasing the overall thickness of the piece. Alternatively a separate collar piece might be used.
- Selis Mendel appears to have had more secure clamping for the X smooth rods, with bolted on collars. Might be combined with a V profile for the hole in the lower piece to ensure rod centering?
- Close the distal holes (like in a recent PrusaJr's design on Thingiverse). The problem is that this needs an exact cutting of the smooth rods. Reduced adjustement possibilities.
- The metal (provisory) solution: prepare those shaft collars, especially on the side that must absorb tension. Tighten at your heart's content. They allow for significant pressure being applied on the smooth rods.
Note: I drilled them at 180 degrees for convenience, but have learned since then that the optimal solution would be 90 degrees between the screws. 120 degrees might be a reasonable compromise.
How to:
- you'll need a stationary drill (drill press), a center punch, 8mm and 2.5 mm drills, an M3 tap, M8 nuts, m3x6 (or similar) bolts
- drill out the nut's center and apply 5-20 circular file strokes until the nut fits snugly the 8 mm smooth rod
- punch the center of two nut's sides 120 dregrees apart
- change to the 2.5 mm drill and drill the nut's sides
- Tap those holes to M3
- File the metal scrapes and adjust the collars on the axes. Tighten ad lib.
Quick change magnetic X carriage
Yes I know, it is a vitamin, I have been nasty, I should be spanked. But this one should be rather easy to redesign in 3d starting from GregFrost's carriage.
- So I wanted a quick change X carriage that allows me to leave alone the bushings and rods, whatever they are.
- Also, I am printing PLA, and there are just too many reports of melted/warped/softened X carriages floating around to be at ease with a PLA carriage. However, this should not be a problem with the bushing holders because of the heatsinking effect of metal.
- I like GregFrost's three bushings X-carriage, but I think the side with two bushings should be positioned near the belt, and not the opposite way.
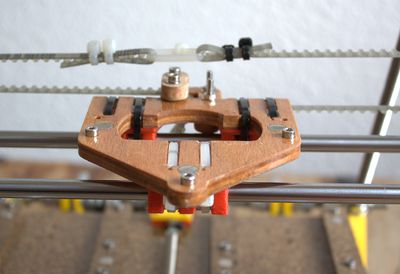
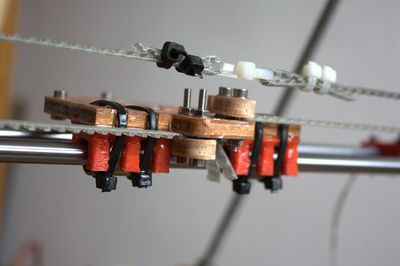
Adopted solution uses 5.7 mm routed plywood and six 8mm diam x 6 mm high cylindric magnets (if you are paranoid you can get heat-resistant versions on eBay at little price difference), three per plate. Magnets are fixed with cyanoacrylate glue before the epoxy treatment. Plywood was soaked in marine epoxy and allowed to cure, the surface is very stiff and resistant. Boltheads are used to secure position with corresponding holes in the upper plates. The holding force provided by the magnets is pretty strong, "just in case" I left also two holes for pass-through bolts. I used three of GregFrost's LM8UU holders not bolted (IMHO bolting defeats the whole purpose of gluing), but epoxied to the carriage according to standard procedure. The zip ties were pre-positioned then tightened before the curing process. The upper carriage features "standard" GregFrost's fixations. Just add quick connectors to the extruder, and (hopefully) you'll be able to change the whole upper plate-extruder block in less than a minute.
Note: this mod adds about 6 mm to the extruder base height. Not sure yet if this will interfere with "standard" hotend length or not.
Files:
Mediawiki rejects the dxfs, so here they are at Thingiverse.
Quick change magnetic base plates
http://www.thingiverse.com/thing:10889
Adopted Nophead's half belt hack
See Hydraraptor blog
Brilliant idea, works like a charm, definitely to recommended! The idler only "sees" a smooth belt. Zip ties are used to make the join and tension the belt (see X carriage picture).
Adopted it for the Y carriage too - with a half-turn on the longer segment and polymide tape on the transversal middle bar to avoid occasional friction between the bar and the belt.
Torsion box mount for the Y motor and pulley
Ran out of zip ties in the attempt to straighten things up. The conclusion is obvious: the Y motor mount has been trimmed down too thin.
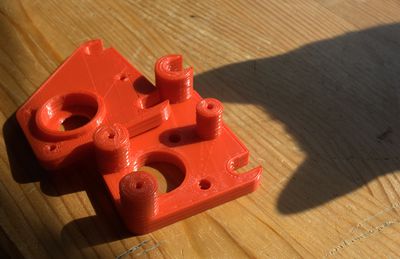
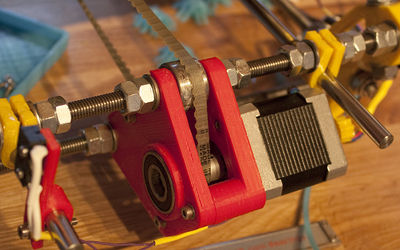
So I designed this replacement part. It uses a 28x12x8 bearing. The assembly has been commissioned, is working as expected, and can accept belts up to 11 mm wide.
The aims of this torsion box mount are:
- to put a mercy end to the y axis motor sorry flexion on its mount (and the resultant lack of parallelism that has the pulley and belt doing very unwanted things)
- to provide support to the Y axis pulley on both ends, thus reducing the forces exerted on the stepper motor bearings
- to improve the general ability to correctly tension belts and improve stiffness, precision and fight backlash.
The files are here on Thingiverse
Torsion box mount for the X motor and pulley
In the works. Any help most welcome!
Adequate crossbracing to rigidify the frame along the X axis
Selis Mendel had a wood or acrylic sheet there, plain vanilla Prusa Mendel has... nothing! So I added those pieces.
They do help a lot improving stability
Files are here:
http://www.thingiverse.com/thing:15606
Details to be solved (hopefully design those parts)
Improve lateral parallelism of the Z axis
The parallelism of the Z screw rod and the Z axis is off by more than 0.2 mm, and the current Z motor mount does not allow for any adjustment at all. Task: Re-design the Z motor mounts so as to give clearance for lateral adjustment.
I hereby banish dancing motors because they are intrinsically evil (TM). I want both Z screws fixed on bearings at the bottom end too.
To do
- Install SD card
SDramps pinout (THX brnd!)
- a machine with a routed frame (something along nophead's ideas)
- An Orca? (but where are the individual files?)
- Parts for a couple of Heliostats? (need enough precision and repeatability)
Lessons learned
dealing with backlash and vibration
Yes, backlash can be caused by the belts too (especially undertensioned ones).
backlash control checklist
belt tension
According to Nophead: "I think belt tension should be high as possible to reduce lash on Mendel, but on Prusa it is limited. As discussed elsewhere too much on Y bends the motor bracket. Too much on X bends the X rods and makes the top Z bushings come away from the bars. The Sells Mendel is a lot better in that respect.... one side effect of belt tension is I think it can change the resonant frequency of the axis, which limits the maximum zig-zag rate when doing small infills... another side effect of belt tension: it affects XY calibration slightly"
loose pulley set screws
...allowing a little slip in each direction from the flat
First signs can be insidious. When fully developed, this is how it looks like:
broken wires in the belt
loose bushings
...allowing the carriage to rotate slightly if it pulled from one side
pulleys with teeth that are narrower than the gaps in the belt
idler play on its axis
Article on backlash at Woodsmoke blog
Have you measured the backlash in your machine? Lashmaze by Woodsmoke at Thingiverse
My spreadsheet for the measurements taken from the Lashmaze Media:woodsmoke_labyrinth.ods
Forum thread to post and discuss results
Gates library: Selecting synchronous belts for precision positioning
Also deals with stiffness: Drive ratio consideration
Practical Methods for Vibration Control of Industrial Equipment. Andrew K. Costain, B.Sc.Eng. and J Michael Robichaud, P. Eng. Bretech Engineering Ltd http://www.bretech.com/reference/Practical%20Methods%20for%20Vibration%20Control%20of%20Industrial%20Equipment.pdf
Details 5 basic methods for vibration control of industrial equipment:
- Force Reduction of excitation inputs due to, for example, unbalance or misalignment, will decrease the corresponding vibration response of the system.
- Mass Addition will reduce the effect (system response) of a constant excitation force.
- Tuning (changing) the natural frequency of a system or component will reduce or eliminate amplification due to resonance.
- Isolation rearranges the excitation forces to achieve some reduction or cancellation.
- Damping is the conversion of mechanical energy (vibrations) into heat.
Methods of vibration control
http://www.iitr.ac.in/outreach/web/CIRCIS/PG/AVN/MVC/Methods%20of%20VibrationControl.pdf
A keynote.
An Analytical Approach to Solving Motor Vibration Problems. Finley WR, Hodowanec MM, Holter WG. Copyright material IEEE Paper No. PCIC-99-20 http://www.sea.siemens.com/us/internet-dms/dt/ElectricMotorsComm/ElectricMotors/Docs/An%20Analytical%20Approach%20to%20Solving%20Motor%20Vibration%20Problems.pdf
Caveat inertial mass
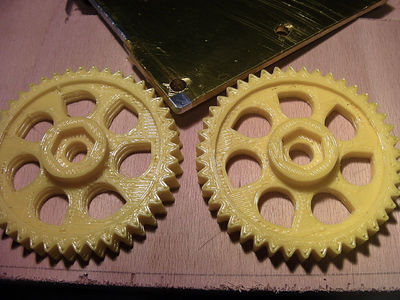
These gears were both printed from exactly the same gcode, "all other things equal", at 25 mm/s. The one on the left shows obvious lost steps on the y axis.
The only difference was the addition of an 10x110mm aluminium plate (pictured above) to have a full build platform. The additional swinging mass proved too much for the wimpy y-axis stepper.
Remedial action
- Lowered speed (skeinforge: "speed" and "limit")
- Slightly increased the y stepper current on the pololu driver.
- Print small objects without the full surface platform
So far, so good. Noisier stepper, though.
Also, possibly, in the firmware: reduce acceleration.
Foreseen explorations
- Heliostats and sun-tracking devices
- Mini solar sinterer / oven ?
- Applications of RepRap technology in biomedical/health contexts
- Homegrown mini-mill for PCBs
- Maybe importing new ideas in a stagnating professional realm
- ...
Design rules and optimization of parts
Material Characterization of Fused Deposition Modeling (FDM) ABS by Designed Experiments Michael Montero1, Shad Roundy1, Dan Odell1, Sung-Hoon Ahn2 and Paul K. Wright1 2001
Also in: Rapid Prototyping Volume 8 · Number 4 · 2002 · pp. 248–257 q MCB UP Limited · ISSN 1355-2546 DOI 10.1108/13552540210441166
http://citeseerx.ist.psu.edu/viewdoc/download?doi=10.1.1.14.2475&rep=rep1&type=pdf
Conclusions of the study:
- Rule 1. Build parts such that tensile loads will be carried axially along the fibers.
- Rule 2. Stress concentrations associated witha radius can be misleading. If a radius area
will carry a load, building the radius with contours is probably best.
- Rule 3. A negative airgap increases both strength and stiffness.
- Rule 4. Shear strength between layers is greater than shear strength between roads.
- Rule 5. Small bead width increases build time. Small bead width increases surface
quality. Wall thickness of the part should be an integer multiple of the bead width.
Low Volume Plastics Manufacturing Strategies. Karania & Kazmer, J Mech Design 129, 2007
PROPOSED BUILD GUIDELINES FOR USE IN FUSED DEPOSITION MODELING TO REDUCE BUILD TIME AND MATERIAL VOLUME Gregory Allen Teitelbaum Master of Science in Mechanical Engineering 2009
http://drum.lib.umd.edu/bitstream/1903/9311/1/Teitelbaum_umd_0117N_10339.pdf
Table 16. Final List of Proposed Guidelines
Proposed Guideline
1. Minimize Height
2. Minimize Form Ratio
3. Minimize Number of Overhangs
4. Build Holes Facing Upward
5. Build Object with Largest Surface on Bottom
6. Rotate build 45 degrees
Optimization of Fused Deposition Modelling (FDM) Process Parameters Using Bacterial Foraging Technique. Samir Kumar PANDA, Saumyakant PADHEE, Anoop Kumar SOOD, S. S. MAHAPATRA IIM Vol.1 No.2, November 2009
http://www.scirp.org/Journal/PaperInformation.aspx?paperID=897
A latest evolutionary approach such as bacterial foraging has been used to predict optimal parameter settings. It predicts parameters in universal range of values that may not exist in the experimental system set up. Therefore, this technique suggests alternative system settings so as to produce optimum results in the process. The parameter settings seem to be logical from the prac- tical point of view. Number of layers in a part depends upon the layer thickness and part orientation. If number of layers is more, it will result in high temperature gra- dient towards the bottom of part. This will increase dif- fusion between adjacent rasters and strength will im- prove. Small raster angles are not preferable as they will results in long rasters which will increase the stress ac- cumulation along the direction of deposition resulting in more distortion and hence weak bonding. Thick rasters results in high temperature near the boding surfaces which may improve the diffusion and may result in strong bond formation.
We at RepRap are just like foraging bacteria...
Other background readings and interesting links
Timing Belt Theory (from Gates Mectrol)
articles to get
FORM ACCURACY ANALYSIS OF CYLINDRICAL PARTS PRODUCED BY RAPID PROTOTYPING G. R. N. Tagore*, Swapnil. D. Anjikar+, A. Venu Gopal* * Department of Mechanical Engineering, National Institute of Technology, Warangal + Research Scholar, Dept. of Mechanical Engineering, NIT–Warangal INDIA.
Manufacturability Analysis of Flatness Tolerances in Solid Freeform Fabrication. Ramakrishna Arni, S.K. Gupta DOI: 10.1115/1.1326439
Layered Manufacturing: Current Status and Future Trends. Debashish Dutta et al. Journal of Computing and Information Science in Engineering MARCH 2001, Vol. 1
Quoted accuracy for extruded ABS in 2001: +/- 0.13mm + 0.0015 mm/mm
Medical
Template Guided Intervention: Interactive Visualization and Design for Medical Fused Deposition Models T.S. Yoo1, J. Morris2, D.T. Chen1, A.C. Richardson3
Rapid prototyping techniques for anatomical modelling in medicine. McGurk et al. Ann R Coll Surg Engl 1997;79:169-174
non-freely available pdfs, investigate how to get 'em
Design of Fused-Deposition ABS Components for Stiffness and Strength J. Mech. Des. -- September 2003 -- Volume 125, Issue 3, 545 (7 pages) doi:10.1115/1.1582499
Kun Tong, Sanjay Joshi, E. Amine Lehtihet, (2008) "Error compensation for fused deposition modeling (FDM) machine by correcting slice files", Rapid Prototyping Journal, Vol. 14 Iss: 1, pp.4 - 14
Getting in touch
lanthanid (at) gmail.com
Looking forward to meeting developers and fabbers around the Geneva (CH) Area
Acknowledgements
This has been a wonderful learning experience, and (at least for one us) a refreshing comeback to past interests and links.
As a full case of information gathering and learning endeavour catalyzed by a set of community-driven projets, we are deeply indebted to the experimental work of the many developers, testers, tinkerers and visionaries in the Reprap constellation: Thank you!
