SettingUpNetBeans
Setting up NetBeans
Software versions known to work are shown in brackets, just in case future releases do not. For Windows:
Download NetBeans (v6.1).
If you're using Windows, download the CollabNet's SVN plug-in (v1.4.6). For Ubuntu simply use the synaptic package manager to download NetBeans. If you already have Subversion downloaded for Eclipse you need do nothing more for that.
Whilst it is possbile to download another set of project files just for use within NetBeans, it makes much more sense to just use the same project files you've already downloaded for Eclipse. (Amazingly, the SVN protocol is so robust that you can successfully sync your local source files through either IDE). Here's how to create the RepRap project within NetBeans:
- Right click on 'Projects' pane, "New Project..."
- In 'Categories' pick Java, in 'Projects' pick Java Project with Existing Sources. Click Next.
- Project Name: 'RepRap', Project Folder: <enter a location here. This is just for the NetBeans project setup files, not the location of Eclipse's RepRap source files>.
- Setting the Main Project check box will make this the default project for the compiler. Click Next.
- Skip the next couple of 'next' steps. Any attempt to be clever here will royally mess it up. Just click 'Finish'.
- Right click on your new project in the 'Projects' pane: 'Set Configuration' > Customize...
- Under 'Categories' click 'Sources'. Under 'Source Package Folders' click 'Add Folder...'. Nav to the src folder previously downloaded through Eclipse & click Open.
- Under 'Categories' click 'Libaries'. Under 'Compile-time libraries' click 'Add JAR/Folder...'. Nav to the lib folder previously downloaded through Eclipse & click Open. Click OK to save the settings.
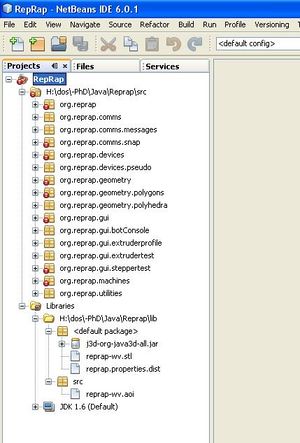
When you use the 'Projects' pane, your setup should now look something like this:
To check SVN is working correctly right click on the project, click 'Subversion' > 'Update'.
Making it work
If you don't have crosses on your packages as shown above, you can skip this section because it works! If you do have errors, it means something's up with the drivers. This is likely to be because your NetBeans down load was a JDK. The JDK has it's own JRE inside it which means you've got to:
- Re-install Java3D
- Re-install the RXTX software into the JDK's JRE
- Re-place the j3d-org-java3d-all.jar (from the RepRap lib) into the JDK's JRE (/lib/ext)
This should rid the errors. Your ready to start editing. Good luck! Here's a nice tutorial on developing GUI's in NetBeans.
Known issues
- If the compiler cannot locate the background reprap-wv.stl file and/or the default properties file (reprap.properties.dist) which are in the Reprap/lib directory you will need to shortcut or symbolic link to the files at the root of NetBeans' RepRap project folder (or wherever the project's manifest.mf file resides). And even then, you will then find that doing a subversion update does not refresh those files. Sadly experimentation with a good NetBeans installation location to automatically find the .stl can't be done my end because there is a bug with NetBeans setting up projects on a network drive.
- In NetBeans the XYZ tab panel will not display in Design mode beacause of the funky code inside the embedded BedPanel object.
-- Main.EdSells - 07 Apr 2008
