Milling and Drilling Head
A RepRap can be converted to a light duty CNC Mill by equipping it with a rotary tool such as a router or a dremel. With one of these toolheads, it is possible to do milling and etching on lightweight materials like wood and PCB.
Due to the lateral stresses incurred, it is probably best to think of it not as a general purpose mill, but a tool for specialized etching and engraving. It is most suited as a PCB Mill.
Contents
About the Raw Material
There are actually two common types of PCB. FR4 is most common, a copper clad heat resistant fiberglass board, and FR2, copper cladded phenolic paper. FR4 is easily available, but FR2 is considered better for this type of work because it is easier to machine. It should be noted that FR2 is not in wide use due to it's lack of heat resistance, and if you are building boards that will require it, FR4 should be used.
The major advantage of PCB Milling is that it is a dry process. Unlike PCB Chemical etching, it does not require the storage or disposal of chemical waste. That said, there can be some danger when creating fiberglass and copper dust. Caution should be taken and respirators should be worn when milling. Also, it is a good idea with Mendel to cover your stepper electronics. Copper kerf is not condusive to the long life of your electronics.
Picking a Tool
Unfortunately, the mendel carriage is just not very large. Most rotary tools that spin fast are pretty large. They're also heavy. Because we don't have a lot of room, we are limited to what we can support.
Another point to consider is vibration. The thicker a rotational tool is, the more vibrations one has to expect. These $30 tools usually aren't fine balanced and $1000 tools are usually out of budget, so the most simple measure for reasonable low vibrations is a small diameter of the tool. Vibration not only increases the effective diameter of a milling tool, it's also cause of burring and wears the machine's carriage bearings.
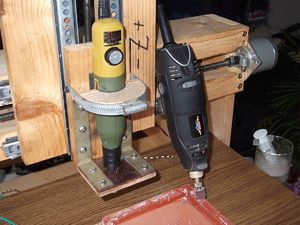
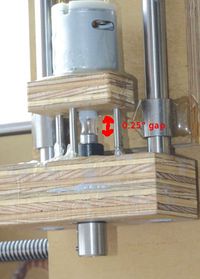
The picture to the right shows a Micromot fitted into the holder of a Dremel. Notice the wooden distance piece, it shows the difference in diameter. The Micromot's vibrations are about 20% of the Dremel's, while the Micromots tiny 40 watts are still sufficient for PCB milling.
Dremel Flexshafts
Bogdan designed a mendel toolhead Dremel_Holder that holds a flex shaft. While this meets the design challenge requirement, it is not particularly suited for PCB milling. Flex shafts are good for extending a rotary tool, but generally lack good bearings in the shaft (at least with dremel tools), so there is some slop in the head. Making a circuit board will probably be the most precise work you will do with your Mendel. If you need to make a .5mm pitch pad, you cannot deal with sloppy tolerances.
Accuracy is also limited by the thickness variation of the blank copper clad pcb, ( as in the normal etch method this thickness is not critical), software that tests the thickness of each part of the board before beginning the milling process, and modifies the milling Z axis path accordingly has higher accuracy (approaching .1mm).
If you do use a dremel flexshaft, it is advised to use a collet rather than a chuck. You will also need to make sure that your flexshaft is lubricated and free of kinks. We found out quickly that a small bend in an un-lubricated shaft will cause the cable inside to break. Mounting the dremel to the ceiling from a hook is a good way to keep bends out of the line.
Proxxon Micromot Rotary Tool.
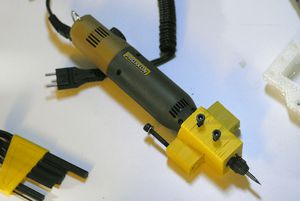
The Proxxon micromot 50 is an affordable ($40 on AMZN) rotary tool that can be fitted in the X Carriage without modification. It also runs on 12V-18V DC power, and can be fitted with Steel Collets. It spins at 20k RPM at 18V. You can attach it nicely to the heater output of your electronics and even control it's RPM with the ATmega's PWM capabilities. Teacup Firmware does this properly.
The RPM control built into the Micromot doesn't work with PC power supplies (confirmed in it's manual), so you can go with the cheaper on/off variant without drawbacks.
There's a wiki page for the Proxxon Micromot 50, showing a number of modifications to make it more accurate.
Mantis Machine Spindle
The Make Your Bot project has developed a low cost (<$20) spindle that has successfully milled PCBs, wax, wood, and even metals. The design is compact/light and probably could be fitted to a RepRap without too much difficulty. See the spindle page or the Mantis Mill 9 page for more details.
A similar (~$60) spindle can also be seen on the MIT Machines that Make page, which shows a few other variations on this style of mill. The dates on designs indicate that this is likely a previous version of the low cost spindle.
Inspiration for Own Designs
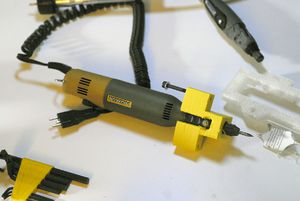
The picture shows the inners of a Micromot 50, specified for 20'000 RPM. Cheapo DC motor to the left, with two non-roller bearings. One single groove ball bearing (MR 128, 8 x 12 x 3.5 mm) to the right. Both are connected by an axial bore in the shaft (just 2.35 mm) and a grub screw.
Advantages:
- Very simple design, no redundant parts.
- Off-the-shelf or simple to manufacture parts.
Disadvantages:
- It's difficult to eliminate axial play, as small groove ball bearings usually have such play.
- Even when well adjusted, play is back after milling about 2 Gen7 PCBs.
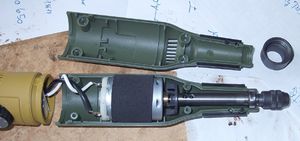
These are the inners of a cheap brand Dremel, specified for 35'000 RPM. The motor shaft is almost als long as the entire machine, no fexible couplings. Groove ball bearing (626 ZZ, 6 x 19 x 6 mm) on each end. The collet holder is made of brass and pressed onto the shaft.
Advantages:
- Very rigid, survived milling about 30 PCBs without noticeable wear.
- Very integral design, few parts -> reliable.
Disadvantages:
- The large diameter produces vibrations a lot stronger than a Micromot, wearing out the X axis of the machine.
- The brass collet wears, after some 100 tool changes it becomes difficult to get a thin drill out.
- Not so easy to make a DIY copy.
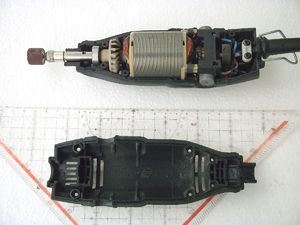
This picture shows a cut out W&H high quality handpiece, specified for 50.000 RPM. About the left half is the (brushless) motor, the right half is the spindle. Both have two roller bearings each, shafts are coupled by some flexible element. This design opens the chuck by twisting the housing (blue).
The ball bearings to the right are wider than usual. Double groove ball bearings?
Printing your tool holder
Each tool is going to be a little different, so you will have to modify your design to fit. Also, you will need to take into consideration the M4 bolts holding your bearings in your X-Carriage.
It is very important that the tool be held firmly, and you retain the ability to change the bit. On the proxxon, the shaft lock is near the tool, and required a groove to be placed in the toolhead. Surprisingly, with a thick enough part, this did not impact the strength of the holder.
The Cutting Tool
Regardless of the machine uesd to spin it, you will still need a cutting head and a way to hold it.
Chuck vs Collet
Collets are a way to get more stability in your tool head. Chucks allow tools to be mismounted. If you have the ability, go with the collet.
Milling bits
The cutting bit on a mill is called an End Mill. These are basically drillbits designed to work when going sideways. There are a LOT of different kinds of endmills, drillbits and tools related to milling.
If your goal is to cut traces in circuit boards, it seems that a spade bit is well suited to the task. Drewtronics.net has 30, 45, and 60 degree spade bits available.
If you are looking to route or drill circuit boards, endmills and pcb drillbits are more appropriate. The main difference again between an endmill and a drillbit is the ability to move sideways. If you try to mill with a pcb drill bit, it will most likely snap. Since it is spinning at 20,000 RPM, you will want to be careful.
People do tell success stories of cutting circuit boards with broken and resharpened pcb drill bits, but it is a lot easier to get results if you just pick up a spade bit.
Software
Skeinforge has cutting options, but there is definitely more than one way to skin a cat.
For PCB related software and proven paths to use it, see PCB Milling.
Cad.py - This is a all purpose tool created by the MIT Center for Bits and Atoms. It will generate gcode from a PNG image. If you want to run a .g file on a mendel, you will need to run it through some postprocessing. Brandon Martin-Anderson has written Mendelize and it is available here. http://github.com/metrixcreate/mendelize
Further reading
- Contraptor has a photo of a kind of Milling/Repstrap hybrid.
- "TwinTeeth: The PCB mini-factory" has a Delta-Pi-like machine that can easily swap heads between (a) a Dremel head to mill a PCB, (b) a hot end to 3D print stuff like any other RepRap, (c) a solder paste dispensing head, etc.
- "MUS - Multimachine Universally Scalable" is apparently designed to mill PCBs, and also swap heads to 3D print plastic parts.
- The "Mendrel" project describes how to convert a RepRap Mendel 3D printer into a ["Mendrel CNC machine". The Mendrel can cut styrofoam with a hot knife (?) or with a Dremel flex shaft.
- (How does the Mendrel flex shaft holder compare to the DremelFlexShaftHolder ?)
