Smoothieboard
Release status: Working

| Description | 32bits powerful and simple to configure electronics
|
| License | |
| Author | |
| Contributors | |
| Based-on | |
| Categories | |
| CAD Models | |
| External Link |
Smoothieboard is a controller board for Reprap 3D printers. It is a descendant of other Reprap electronics like RAMPS, RAMBO, Melzi and 4pi.
The main design change from older boards that is uses a more powerful ( ARM 32bits ) Cortex-M3 Microcontroller.
The board is named Smoothieboard, and the firmware that runs on it is called Smoothie.
The Smoothie project's main design goals are :
- Ease of use and configuration
- High performance ( faster speeds, smoother motion, thus the name )
- Also works for laser cutters and CNC mills
- Ethernet ( web interface ) support
- Easy to contribute to, feature-rich
- Strong documentation effort ( beginner-friendly, coherent, up to date documentation )
Features
- Smoothieboard
- ARM-Cortex M3 LPC1769 ( 120Mhz, 64kB RAM, 512kB Flash ) Microcontroller
- USB2 interface
- Ethernet interface
- MicroSD card slot ( comes with a 4GB SD card, filled with documentation and host/slicing software packages )
- 5 stepper motor drivers ( A5984, for stepper motors rated up to 2 Amperes ), well cooled on-board, 1/32 microstepping for smooth motion
- Digital current control ( no need to use a screwdriver to set a potentiometer for current setting )
- 3 ZXMN4A06 ( 5A, up to 24V ) small mosfets for hotends and fans
- 3 AOT240L ( 12A, up to 24V ) big mosfets for hotends, fans and heated beds
- 12 to 24V power input
- Optional Voltage Regulator so the board can run without a host computer
- 4 Thermistor inputs ( 12bit ADC ) for thermistors
- 6 Endstop inputs
- Extensions : SPI, I2C, PWM, DAC, free GPIOs
- Un-pluggable screw terminal connectors for easy wiring
- Everything broken out for easy hacking and inventing of new things
- Open-Source Hardware, community developped
- Compatible with the RepRap_Interface_Standard
- Smoothie firmware
- Designed to take advantage of Smoothieboard's higher processing power
- Motion control code was initially a port of the popular GRBL firmware
- Supports all features found in Reprap firmwares
- Compatible with the normal Reprap ecosystem ( G-code flavour ), making it compatible with the common Reprap Hosts ( Pronterface, Octoprint etc )
- Easy configuration using a simple configuration file on the SD card ( no compiling/flashing required )
- Serial interface over USB
- Mass storage ( exposes the SD card content allowing for easy access to the configuration file ) over USB ( simultaneous with the Serial interface )
- Ethernet support exposing Telnet, HTTP ( Web interface ) and SFTP interfaces.
- High step rate ( 100khz ) for higher movement speed or high microstepping
- Many improvements to the motion control code allowing to use the higher processing power for more correct and smoother motion control
- Longer and faster look-ahead for acceleration
- Supports alternative arm solutions beyond cartesian : Linear delta ( Rostock ), H-Bot/CoreXY, Morgan Scara, Feather
- Also supports laser cutting, CNC milling, paste extrusion
- Support for arbitrary number of extruders and hotends
- Support for arbritrary number of "switches" ( configurable G-code controlled inputs or outputs )
- Touchprobe support ( autolevelling and auto-calibration )
- PID control and PID auto-tuning
- Support for several common "panel" controllers
- Easy firmware upgrade via the SD card
- Modular and well commented code
- Simple to contribute to ( modular design means you only have to add/edit one file to add a feature )
- Integrated debugger support ( DFU for flashing and MRI for GDB )
- Wiki-based documentation with a large coverage, and an emphasis on being beginner-friendly
- Community reaching outside of 3D printing resulting in additional features and code/documentation contributions
- Open-Source Software ( GPL v3 ), community-developped
Safety
- Always make sure the polarity is correct when wiring in power inputs ( coming from the Power Supply ). Reversed polarity can damage or destroy all or part of your board. Polarity is indicated on the board itself by the + and - signs. Double check. On older versions of the board, markings are partially hidden by the connector, making it confusing. Only rely on the diagrams. The main ( labelled VBB ) power input has a reverse polarity protection, however, it will not hold forever. As soon as you notice something is wrong, turn the power supply off and check again.
- Never disconnect or connect stepper motors from the stepper motor drivers while the board is powered ( ie when the Power Supply is turned on ). The drivers have very good protection against most possible problems and are very hard to accidentally destroy. This however could damage or destroy them
- Be careful that nothing metallic ever touches the board while it is powered on. Falling screwdrivers, nuts and bolts can cause shorts and destroy the board. Check the board before powering it on.
- Always check the schematic before connecting power sources ( coming from the Power Supply ) to the board. Connected to the wrong connector, they can destroy components. A common example of this problem is plugging a power input cable, into the connector for an output.
- In the case of the VBB power input, be careful. If your board came with connectors pre-soldered, the 5mm connector is present, and the polarity of that connector is that of the large traces in the wiring diagram to the right ( red is +, blue is - ). On some boards, the marking on the boards may be hidden by the connector itself, so for VBB, do not rely on the markings on the board, but on the diagrams on this page. However, if you did not get your connectors soldered, and want to solder a 3.5mm connector instead of a 5mm connector, also note that the polarity is the opposite.
Guides
The Smoothie documentation wiki has a full guide to installing a Smoothieboard into a 3D printer.
This applies to all Reprap 3D printers.
This guide can be found here : 3D printer guide
There are also guides for those using their Reprap machine for CNC Milling and Laser Cutting
These guys are step by step guides for beginners or easy reference, they tend to be exhaustive in explanations, but do not got too deep in each subject technically.
If you need more in-depth information about any aspect, check the full documentation
Support
There are several ways to get help with Smoothie/Smoothieboard :
- If you have a question please first check that it is not already answered in the documentation
- Live support can be found in the IRC channel ( #smoothieware @ irc.freenode.net )
- You can also ask on the mailing list
- There is also a forum in which you can ask questions. You can also browse it for previously answered questions.
- If you can not find an answer, you can also directly contact via email
Source
The design files for Smoothieboard can be found on github
The source code for the firmware can also be found on github
Board types
There are 3 versions of the Smoothieboard :
- 5X has 5 stepper motor drivers, 3 small mosfets, 3 big mosfets, and Ethernet support, typically used for 3D printers with two or more extruders
- 4X has 4 stepper motor drivers, 2 small mosfets, 2 big mosfets, and Ethernet support, typically used for single-extruder 3D printers
- 3X has 3 stepper motor drivers, 2 small mosfets, and no Ethernet support, typically used for laser-cutters/plotters
The three different versions were created so that users that do not need all the features on-board can get a board for less money.
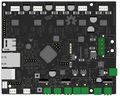
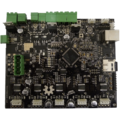
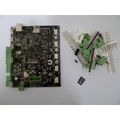
Pictures
Fritzing representation
5XC Smoothieboard
5XC Smoothieboard with connectors

