P3Steel
Release status: working

| Description | Remix of Twelvepro's redesign of Josef Prusa's i3
|
| License | |
| Author | |
| Contributors | |
| Based-on | |
| Categories | |
| CAD Models | |
| External Link |
Contents
Presentation
The P3Steel is a remix of Twelvepro's redesign of Josef Prusa's i3.
Leonardo - the prototype P3Steel printer - was designed and built by Irobri in April 2013, after attending a local Maker show in Zaragoza, Spain.
The main frame structure, built from laser-cut 3mm steel, is extremely strong and simple to assemble, and eliminates the need for several printed parts due to the use of steel parts instead of threaded rods for the "Y" subframe (as in the original Prusa i3 and many of its variants).

- Steel as a building material has several advantages over e.g. aluminum
- Steel is one of the least expensive building materials available - structural steel is 10 times cheaper than aluminum.
- Laser cutting steel is easier and cheaper than cutting aluminum.
- Steel is stronger than aluminum.
- Disadvantages
- Steel is 3 times heavier than aluminum.
- Structural steel requires painting for protection against corrosion.
The P3Steel design is for 3mm thick steel and with lots of carvings to reduce weight. All square holes and tabs have special rounded corners for accommodating corresponding parts and give a very good fit between parts.
The design has slots for M3 nuts in the places where the screws fit so no threading is required.
Improvements over the standard Prusa i3
- Stronger frame due to the use of structural steel.
- Solves the frame oscillation thanks to its reinforcement squares.
- Simplifies the construction, eliminating the complex subframe of threaded rods in the Y-axis.
- Once assembled, everything is in place, no adjustments needed.
- Eliminates the need for several printed parts.
- The steel mounts for motors and rods are much stronger than their plastic counterparts.
- The only two threaded rods needed are the ones for the Z-axis.
- Uses shorter smooth rods lowering the build costs.
- Once assembled, it forms a compact, solid structural unit that can be transported as a block.
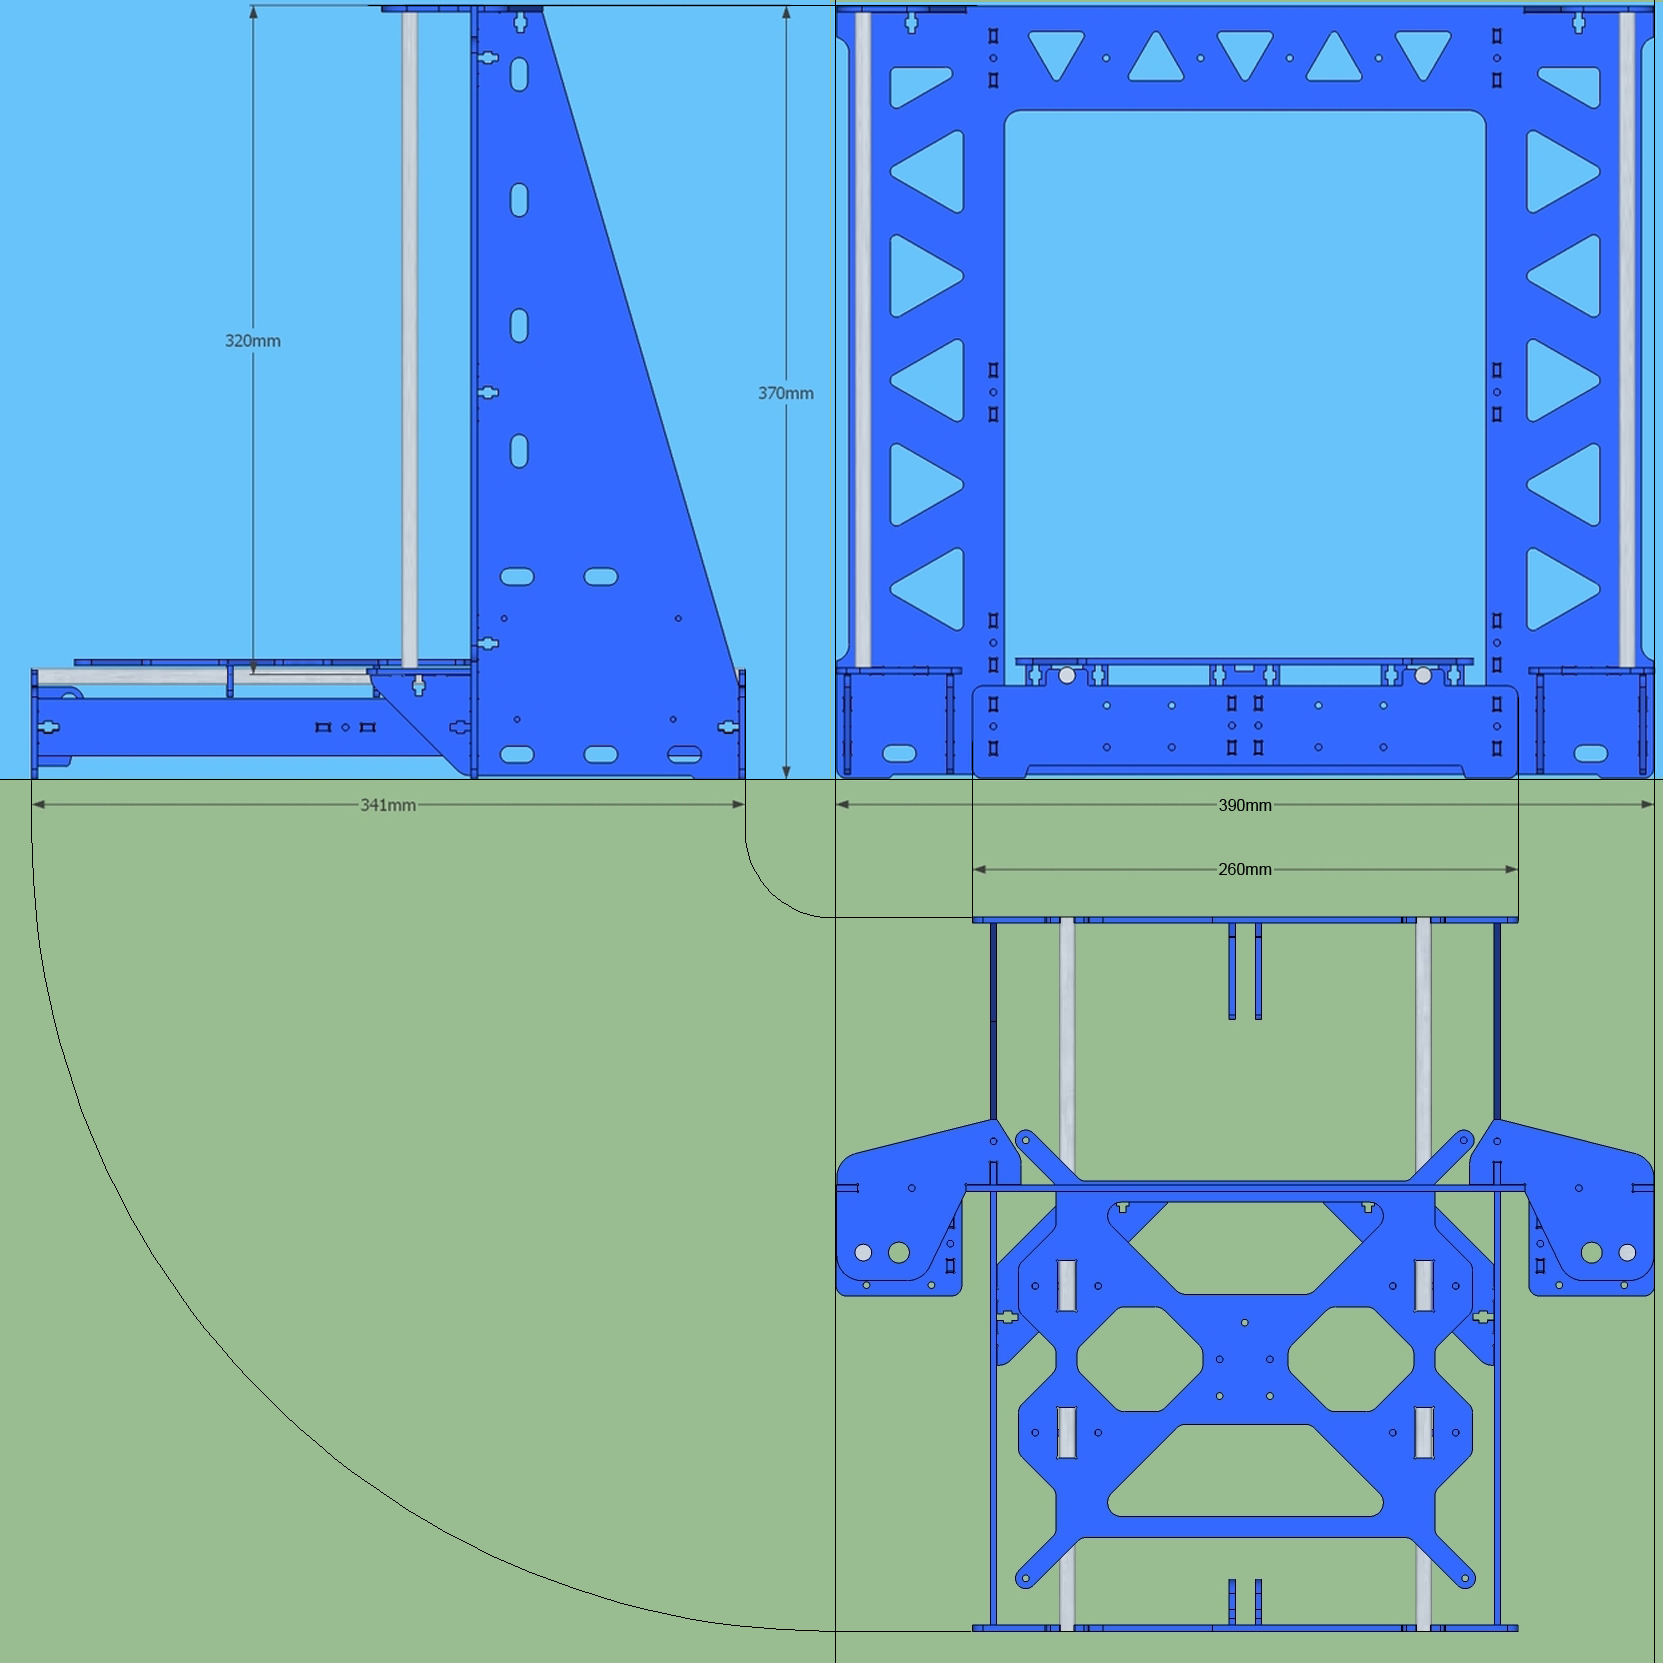
Principal dimensions

Instructions
To be completed.
Version 1.2: Leonardo, original printer, the one I made.
Version 2.0: After some requests from a Spanish group buiding around 30 printers, I have modified the bed, now it holds with 4 LM8UU instead of 3 and it has also a system to level with 3 points instead of the original 4, it should be easier with this new design. I kept the original 4 points also just in case someone still wants to use them. I included in the gallery some 3Ds of the new bed. The rest of the printer is exactly the same as version 1.2
Everything snaps together and holds with M3x12 screws (mainly), I also used nylon self locking nuts to prevent future problems due to vibration.
The printer uses 8mm chromed smooth rods (Z axis: 2 x 320mm, Y axis: 2 x 341mm and X axis: 2 x 375mm) and only two M5 threaded rods (295mm approx. each since depends on motor coupling and if you want some to stick out through the top) for the Z axis, printed parts required came from a standard Prusa i3, you only need the parts for the X axis assembly and the extruder.
The printer structure is assembled quite fast and needs no adjustments. The electronics are installed on either side of the frame, horizontally, holes provided are for an Arduino mega and RAMPS 1.4. Motors are NEMA 17, GT2 pulleys, LM8UU and 608zz bearings. Hotend is budas type, but depending on the extruder plastic parts, will also accommodate J-head and E3D hotends. The hotbed is the standard MK2B.
Version 2.01 (by AndrewBCN): this is exactly the same as version 2.0 except for the changes listed below.
- The interference between the Y stepper and the M3 nyloc nut holding the Y stepper support has been solved by stretching the support by 2mm.
- The frame has been stretched by 9mm, meaning the Y-axis 8mm smooth rods should now be 350mm long (same as the original Prusa i3), and not 341mm long anymore (4mm have been added to the front and 5mm to the back).
- Two 3mm holes have been added along the sides of the front Y-axis subframe, one on each side. (Why?)
- The practically useless part that could eventually be used as a Y belt holder has been deleted (there are much better designs that can simply be printed).
CAD file for version 2.01: File:PRUSA i3 steel 3mm lasercut 2.01d irobri.dwg
Assembly animation
<videoflash>In_Q6NkX3fs</videoflash>
On YouTube: https://www.youtube.com/watch?v=In_Q6NkX3fs
Modification to use Spindles
To use 10mm diameter spindles we need to separate the smooth rod and the spindle, leaving room for the nut and bearing parts in the X axis. Therefore some adaptation is required. We have designed a few pieces for use them in the original structure, so the changes were minimal.
This file File:Adaptacion Husillos.zip contains the OpenSCAD design files along with some other files to support for visualizing the set.
Where to buy
- Orballo Printing
- RepRap Forum https://groups.google.com/forum/#!msg/asrob-uc3m-impresoras-3d/waJV15JftZ4/TTAb1bQ4mPQJ (Stainsless Steel, S235, Rods...) We ship to EU.
- iFusionShop
- KITPRINTER3D (required vitamins to make a P3Steel from a Prusa i3), complete kits starting at 409€ VAT included
- CREATEC 3D
|
|
Proyecto Clone Wars |