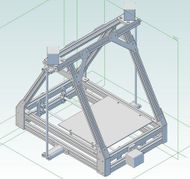
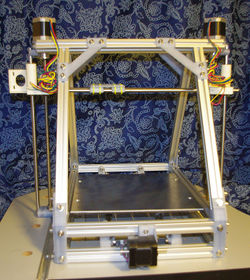
MendelMax/ru
|
English • العربية • български • català • čeština • Deutsch • Ελληνικά • español • فارسی • français • hrvatski • magyar • italiano • română • 日本語 • 한국어 • lietuvių • Nederlands • norsk • polski • português • русский • Türkçe • українська • 中文(中国大陆) • 中文(台灣) • עברית • azərbaycanca • |
Release status: Работающий
| Description | Настоящий reprap; печатные скобы с жестким алюминием[extrusions] ].
|
| License | |
| Author | |
| Contributors | |
| Based-on | |
| Categories | |
| CAD Models | |
| External Link |
Эта страница о MendelMax 1.x , смотритеMendelMax 2- это его преемник.
Пожалуйста обратите внимание: эта страница -текущая версия документации созданной сообществом (Пожалуйста внесите свой вклад!). Официальная документация находится на MendelMax.com. Пожалуйста обратитесь так же к этому сайту
Обзор
MendelMax (в дальнейшем MM) это проект 3D принтера с открытым исходным кодом MendelMax MendelMax (MM) RepRap разработанный Maxbots ы декабре 2011. Это настоящий reprap с использованием напечатанных скоб, но вместо использования ходового вента используется недорогие алюминиевые профили. Они дают огромное увеличение жёсткости, при минимальных дополнительных затратах(Самостоятельное приобретение обойдётся примерно на 80 $ дороже нежели стандартная Prusa у рекомендованных поставщиков). Требуемые алюминиевые профили доступны по всему миру у множества поставщиков.
MendelMax основан на Prusa Mendel и сохраняет его лучшие части. Prusa Mendel сохранил конструкцию Sells Mendel, но исправил проблемы в осях X,Y,Z. MendelMax 1.0 основывается на этом, в значительной степени сохраняя текущие оси X,Y,Z, но полностью переделав конструкцию рамы.
Помимо повышенной жёсткости, принтер намного проще собрать нежели стандартную Prusa. даже у начинающего сборщика не должно возникнуть проблем в сборке принтера за один-два вечера. Вместе с простотой сборки приходит и возможность взлома???. Практически любую часть принтера можно легко снять с помощью 1-2 болтов, поэтому замена практически любой части конструкции теперь является простой задачей.
The X axis is taken stock from the Prusa Mendel, in fact we don't even specify a specific X axis design, there are several good ones available, including the various vertically-oriented X axis designs that many people are exploring lately. As long as it sticks to the defined standard spacing between the Z rod and the Z leadscrew, it will work fine with MendelMax. We also use the standard Prusa Y design (For version 1.0), though we simplify it just a bit by making it easier to get everything aligned right. Z adds optional thrust bearings to support the weight of the axis (greatly reducing the problems with printed couplers), but this is a purely optional upgrade, and you can easily use the old design if you prefer.
Because MendelMax is primarily defining a new frame design, it is linear-bearing agnostic. I have used both LM8UU's and PTFE bushings and both work just fine. Brass or even printed bushings could be used, though I recommend avoiding the latter for highest reliability.
The current revision as of July 17 2012 shipping as kits from the official MM store is considered the MM 1.5+. It uses a linear slide for a Y axis rather than polished rods to give the heaviest axis a smoother motion and seems to have cleaned things up greatly. Also different from earlier models the steppers controlling the Z axis have been moved from the top of the printer to the base.
Versions
| Version number | Source links | Bill of Materials | Assembly instructions | Comments |
|---|---|---|---|---|
| 1.0 | Main frame | BoM | TechPaladin's guide (Archived) | Top mounted Z-motors. Rod based Y-table |
| 1.5 | Main frame Lasercut Y-table |
BoM | Instructions by Theo Deyle (Note: The Y table described is for 1.5+) |
Bottom mounted Z-motors. Rod based Y-table with laser-cut parts |
| 1.5+ | Same as 1.5. | Similar to 1.5, except for Y parts. Kit packing list |
Instructions by Theo Deyle | Bottom mounted Z-motors. Rail & car based Y-table |
| 2.0 | See the MendelMax 2 article for information about that version. |
Specifications
These specifications are for the MendelMax 1.5+:
- Printed Parts: very few (around 25 different parts)
- Non-Printed Parts: ???
- Printing Size: build area of about 9"x10"x7" or 23cm x 25cm x 17.5cm
- Material Cost: ???
- Cost: US$ 1,300 (complete kit)
- Precision: ??? (position), ??? (printing)
- Speed: ??? (position), ??? (printing)
Links
- [1] MendelMax 1.5 STL Files
- [2] Maker's Tool Works MendelMax 1.5+ Build Instructions
- [3] Lots of pictures, including the assembled printer and several finished prints
- [4] 3D-PDF (View with Adobe Acrobat, most 3rd party viewers do not support 3d PDFs. Click on the image to view in full 3D, pan, zoom, rotate, etc.)
- [5] Packing list for a MendelMax 1.5 kit
- [6] MendelMax 1.5 with SCV8UU Y-Carriage
- [7] RepRapWorld - Mendelmax 1.5 Complete Kit starting at 549.99€ and parts
- [8] Blomker Industries - MendelMax 1.5 Complete Kit at $699
- [9] Ultibots - MendelMax 1.5+ Complete Kit starting at $1199
- [10] ReprapUniverse (NL) - MendelMax 1.5 : Printed Parts €79 - Frame Kit €299 - Complete Kit €699
- 220v.biz Parts for MendelMax and other 3d printers in Ukraine
- [11] MendelMax 3D view and complete files (Spanish)
- [12] 3DMarkt.at in Austria, MendelMax 1.5 Printer Kit 659,99 EUR
Community
- For more information, visit our FreeNode IRC channel at #MendelMax (or ask in #reprap). Please be patient, this is presently a low-volume channel so it may take a while to get responses but someone will help you as soon as possible.
- Please join our Google Group.
Files and Documentation
For 1.x:
- STL Files can be downloaded from thingiverse. RAScomRAS
- FreeCAD SCAD source files are available at the MendelMax GitHub repository.
- A full Bill of Materials (BOM) is available on Google Docs, although this is the BOM for Version 1. Vendors are typically selling parts for MM 1.5, so you will need to make some substitutions.
- Assembly instructions and lots more information are available on the MendelMax homepage.
- User submitted calibration information and tips at the Mendel Max Calibration page
For 2.0:

