Garpom
|
English • العربية • български • català • čeština • Deutsch • Ελληνικά • español • فارسی • français • hrvatski • magyar • italiano • română • 日本語 • 한국어 • lietuvių • Nederlands • norsk • polski • português • русский • Türkçe • українська • 中文(中国大陆) • 中文(台灣) • עברית • azərbaycanca • |
Release status: working

Contents
Introduction
The RepRap Garpom is an open source 3D printer that uses fused deposition modeling (FDM).
The Reprap Garpom is a CoreXY. Its goal is to be easily upgrade to diferent sizes, with a accesible frame. The bed is moved and support by belts, with only one motor.
Specifications
- Printed Parts: 60
- Non-Printed Parts:
- Material Cost: 300€~
- Cost: not for sale, yet
- Printing Size: 300mm x 300mm x 350mm (can be extended)
- Precision: ??? (position), ??? (printing)
- Speed: 500 (position), 120 (printing)
- Footprint: 500mm x 500mm x 510mm
Descripción General
The proyect begin on November 2015
The frame is made with extruded aluminum profile 20x20 V -slot or T -slot within some measures 500x500x500 mm. It Accommodates a volume of 300x300x300 impression . It has been kept as open as possible front for easy access to printed pieces. Its configuration is a CoreXY . Two engines move the axis X and Y,together . Both engines remain static reducing the inertia of the carriage, and allowing high speeds. Z-axis movement is performed by GT2 belts and a single motor.
Hardware
Frame

I use aluminium extruded profiles 2020 , these can both V -Slot as T -Slot . I make the structure with printed pieces and appropriate screws . The printer has a open concept on the front ,so I had to reinforced z axis column with a double column , which serves itself as lane substructure impresión. Most engines are NEMA17 , and belts GT2. The total engine is 4 , including a single extruder(Nema14) .
Mobile parts
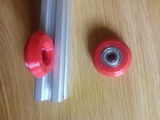
Print carriages X and Y slide on smooth rods 8 mm , and the z axis on the profiles themselves supported on wheels 2020 nylon bearings
Electronic
It used for controlling the RAMPS 4 mounted on an Arduino MEGA , well known.
3+1 motors NEMA are required , 3 for the axes (NEMA17) and the fourth (Nema14) for the extruder .
It uses to heat the print surface a bed silicone 12v, with a current of 16A . This high current forces to reject the use of RAMPS as power control. It use a relay controlled by the RAMPS so that we avoid the fuse is triggered or the MOSFET RAMPS burn.
As power supply , I'll use a switching power supply . With a small auxiliary source of 5V to power a Raspberry Pi with Octoprint , plus a relay to switch off the power Gcode through M81 and M80 turn ON. With this latest increase slightly printer security .
It also will mount a LCD control with SD card to give autonomous use without a computer .
Extruder
400px|thumb|right|Extrusor universal
I made two diferents carreages for X axis. One of them was desinged for Bowden, and the other for a Direct extruder.
Printed Parts
Download link STL's Github
Extructura


EjeZ
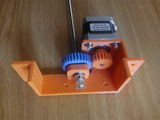
Mount for Z Axis Motor Z Axis Motor
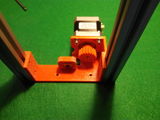
Motor Z axis
Mount motor Right side Download
Printed rollers Download
- End StopZ.jpg
EndStop Tornillo


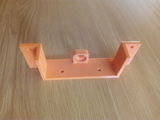
Bed

Bed corners Download


Eje X
- Carro Y derecho.jpg
Carro Y Descarga
- CarroXY.jpg
Carro Principal Descarga
- CarroXY 2.jpg
Carro Principal
- E3D direct.jpg
Extrusor Directo E3D CarroExtrusorIdlerEngranaje_grandeEngranaje_pequeño
- Poleas.jpg
Poleas Descarga
Electrónica
Para el montaje de la Ramps he optado por la https://www.thingiverse.com/thing:761806 impresa. La podéis encontrar en Thingiverse. De esta formo aporto seguridad y al mismo tiempo vitosidad al montaje de la electrónica RAMPS.
Para alimentar toda la impresora uso una fuente conmutada de 300W.
Montaje
Cama
Comenzamos el montaje de la extructura de la cama. Para ello empleamos: 2 perfiles de 280 mm. 2 perfiles de 400 mm. 4 esquinas impresas. Tornillos y tuercas. M4. Recordar colocar las tuercas de las escuadras móviles de la bandeja antes de cerrar la estructura.
- Extructura cama.jpg
Extructura
- Esquina cama1.jpg
Esquina
- Detalle esquina cama.jpg
Detalle 2
- Tuerca nivelacion cama.jpg
Tuerca nivel cama
Core XY
- MotoresXY.jpg
Motores XY, tensores.
- MotoresXY 2.jpg
Motores XY, tensores.
- MotoresXY 3.jpg
Motores XY, tensores.
- Carro montado1.jpg
Detalle poleas de la esquina y el carro.
- Esquina poleas.jpg
Esquina frontal de las poleas
- Vista poleas carroY1.jpg
Vista carro Y con las poleas montadas
- Vista poleas carroY2.jpg
Vista carro Y con las poleas montadas
- Vista poleas carroY3.jpg
Vista carro Y con las poleas montadas
Columnas Z
Para montar las columnas Z previamente habremos montado el motor Z y los rodamientos en sus correspondientes lugares. Colocares dos perfiles de alumnio de 460 mm, y los uniremos con las piezas impresas.
- ColumnaZ 1.jpg
Detalle 1
- Engranajes Z.jpg
Motor Z
- ColumnaZ 2.jpg
Detalle 2
- Lateral montado.jpg
Lateral montado
- Detalle ruedas 2.jpg
Detalle ruedas cama
- Detalle ruedas1.jpg
Detalle ruedas cama
En motor del eje Z es un Nema17 equipado con una reductora planetaria, que le da la suficiente resistencia para soportar la cama con los stepper apagados.
- Engranajes Z.jpg
Reductora
- Reductora Z2.jpg
Reductora
- Aplanamiento ejeZ.jpg
Aplanamiento eje Z
Estructura
Para la construcción de la estructura empleo, en perfil 2020:
10 unid de 460mm 4 unid de 500 mm 2 unid de 280 mm 2 unid de 400 mm
Detalles generales de la estructura, para reforzarla, y evitar el pandeo de las puntas he colocado unos fondos de DM de 3mm. Le fondo inferior corre dentro del perfil y tiene unas medidas de 472x472mm. Mientras que le posterior mide 500x500, y va atornillado al perfil, dandole mayor rigided.
Además ambos cumplen otra función; el inferior será una bandeja que retendrá los restos de plástico. Y el posterior soportará toda la electrónica y la bobina.
- Esquina posterior fondo.jpg
Esquina posterior con el fondo
- Motor esquina trasera.jpg
Motor esquina trasera
- Carro montado1.jpg
Carro montado
Las correas miden 162cm
Varios
Como accesorios podemos montar un extrusor típico Greg para el Bowden. Y también un soporte de bobina. Yo me he diseñado el mio, pero podéis poner el que queráis.
- Extrusor.jpg
Extrusor
- Soporte Bobina.jpg
Bobina
Variantes
La impresora es fácilmente escalable, pudiendose realizar en cualquier medida con unas variaciones mínimas. Partiendo del tamaño XL describo a continuación cada una de las medidas mas comunes.
Garpom Size L
Ésta denominación corresponde a la variante con superficie de impresión 300x200x300. Se trata de la misma extructura con las puntas frontales recortadas. Se mantiene el sistema del eje Z con pequeñas variaciones. Alberga una cama de 200x300. Además es la que tiene la extructura mas rígida, ya que al recortar las puntas las esquinas se verán reforzadas con escuadras.
Garpom Size M
Ésta denominación corresponde a la variante con superficie de impresión 200x200x300. Se trata de la misma extructura a la que únicamente se escalan los perfiles de aluminio 2020. Alberga una cama de 200x200. Dada las reducidas dimensiones, la bobina de filamento pasa a estar en el exterior de la impresora.
Equipo
Aunque es un proyecto personal no está demás agradecérselo a mis compañeros de Bricolabs. Y en especial a:
Xoan Sampaiño, por compartir sus amplios conocimientos. Mario y Xosé Pérez, por sus alabanzas y ánimos. Milo, Roberto Río y Félix Sánchez-Tembleque por sus críticas constructivas.
y
VicentM de CloneWars, que se interesó sobremanera por el proyecto y compartió sus conocimientos.