Example DIY Floating Supports in Blender
|
English • العربية • български • català • čeština • Deutsch • Ελληνικά • español • فارسی • français • hrvatski • magyar • italiano • română • 日本語 • 한국어 • lietuvių • Nederlands • norsk • polski • português • русский • Türkçe • українська • 中文(中国大陆) • 中文(台灣) • עברית • azərbaycanca • |
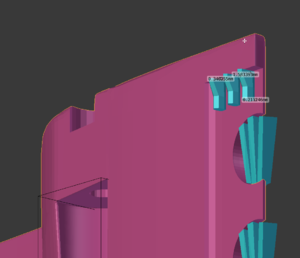
A few examples of DIY supports, in blue.
The "floating" supports at the top are fins which are spaced from the vertical pink wall by about .21mm. They are roughly .35mm below the horizontal solid object surface above, and about 1.5mm apart from each other. The 0.21mm horizontal spacing allows the slicer, in this case, to avoid printing them as a single piece with the main object's body, but it's close enough that the filament curl and bulge allowed the supports to lightly touch and join the object body, but be readily removed with minimal bonding and marking.
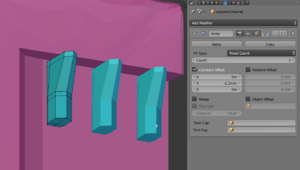
In the closeup image you can see it is one support (mesh), with an Array Modifier to duplicate it at 2.2mm center-to-center spacing (ending up at 1.5mm apart in this case).
See Also
Additional Considerations
- Direction of fins: In this case, the fins are oriented at 90 degrees to the overlying layer's outline, once sliced. One must always consider the direction of the overlying layer's eventual traces/path, including the solid infill direction.
- Spacing: Depending on how clean you want the overlying object's layer to be, you can adjust your spacing for whatever tolerance you have for the bridging. Sometimes you want to make sure you have enough room to fit a screwdriver between the fins to break them out. In this case the floating nature and location allowed them to readily and relatively cleanly be removed.
- Note: I tend to join my supports to the final object with a boolean union.
Some Radial Supports
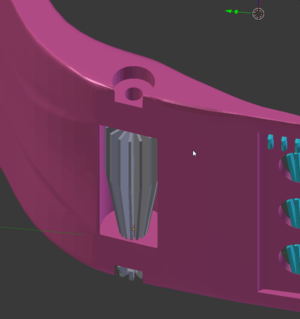
Here, in grey, radial supports are used. It's not necessarily the most efficient or minimal support structure, but it works for this design. With the circle hole, the slicer will again create circular paths, then fill with the object's solid layer's fill type. One must consider that a solid infill could end up with some number of paths which do not touch the radial fins at all -- that is, they will have to bridge without support. A more complicated fin pattern could be used for this case; perhaps with a wavy clam-shell top, or zigzag, or in some cases just resort to your slicer's own supports.
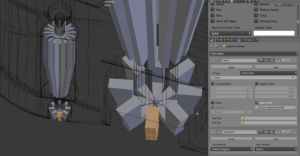
The closeup of the supports has the object in wireframe, so some other design considerations can be seen. The bottom radial fin array is designed so it has a layer or two where all the fins meet so close that they will join into one by the extruded paths, or the slicer itself will join them for you.
Also seen here is the Array modifier, again. To create radial arrays in Blender you must unfortunately use a separate object and rotate it. It is most common to add an empty for this purpose.
- Tip: Triangulating before exporting (as STL) seems to provide meshes that function better in at least some slicers. While I triangulate the final object (the union of the object and supports), the modifier is shown here as an example even though it's on the bottom radial support fin object.


