BrickRap
Release status: Experimental

| Description | A back to the roots RepRap approach
|
| License | GPL ?
|
| Author | |
| Contributors | |
| Based-on | |
| Categories | |
| CAD Models | |
| External Link |
Contents
BREAKING-NEWS: BrickRapBuildManual including stl-files and BOM
03-05-2015: I start releasing all stuff in order to encourage others to build a BrickRap and solve open issues!
Check the all-new BrickRapBuildManual and build your own Ultra-low-vitamin-count-BrickRap for less than 140€ !!!
Have fun!!!
Project Description
This is my entry for the Gada Prize.
A RepRap which is "back to the roots", in other words: Focus is not on printing speed or fancy features but on the capability to reproduce itself.
This shall be achieved by using "RepBricks" which are easily stacked together like the famous bricks for children. Compatibility to commercial brick systems will even allow to build a BrickStrap using your childrens bricks.
Inspiration for this Project Comes from the following projects: Lego RepStrap MendeLego LEGObot 3D Printer by matstermind and LegoStrap(which is quite empty...)
However I decided to use double sized bricks to lower the part count and increase ease of assembly. NOTE: Changed to BitBeam-like Bricks due to problems with Duplo-like bricks
Development Goals:
- Extremely low cost
- Ultra-low vitamin count
- Brick based construction (modular concept)
- Compatibility of the bricks to commercial brick systems
- Easy to build
- Mother-Child principle:
- BrickRap children have small printing area (just enough to print parts for growing)
- Capability to grow in size by printing "growth parts"
- Rack and pinion drivetrain will make growing easier
- Herringbone gears will drive the Rack and thereby self-center the drivetrain (likely to be abandoned, printing herringbone is quite unstable on my printer)
Why use RepBricks?
While all the new developments are really great projects, they tend to be more and more professional. Costly vitamins are required for most of them. In my personal opinion the idea of a self replicating machine is not the focus of those high sophisticated machines. By using only a limited set of easily stackable "RepBricks" one could use parts from older designs for new machines (Maybe not only RepRaps). Furthermore the compatibility to commercial bricks can lower the entry barrier for beginners, as a lot of people already own enough bricks to at least build the structural parts of BrickRap.
One limiting factor in the RepRap growth function is the manual assembly. Using the Brick principle it is already possible to build assembly devices which could be used in the replication. Lego 3D-Drucker (german)
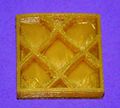
RepBricks (old version) deviate from classic Duplo-Bricks in a way that their shape is optimized for printing. This shall be achieved by replacing the "inner nibbles" by a quadratic grid of straight walls which are rotated 45° related to the outer brick walls.
Bottom style 1
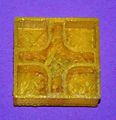
Bottom style 2


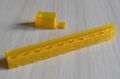
RepBricks in their actual specification are based on BitBeam, with some modifications to work with pin connectors and to be printed more easily.
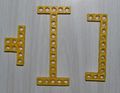
Set of RepBricks
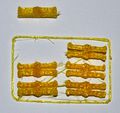
Set of connectors
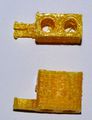
Direction changer
RepBrick slide bushing
RepBrick stepper motor holder


One more advantage which I recognized during the ongoing development process is that it is very easy to change the printer configuration when using RepBricks. This facilitates the implementation of new ideas.
Mother+Child principle
The Mother in this context is a full size BrickRap with a printing area sufficiently big to print all used RepBricks. The child however is the smallest possible BrickRap, with a print area as small as one standard (to be defined) "GrowthBrick". Using this principle a BabyBrickRap can produce the parts required for its growth on its own. In the meanwhile the MotherRap can produce more babies or help the BabyBrickRap to grow.
Preliminary BabyBrickRap specifications:
- Print area: 2x2 nibble brick
- Print height: half standard brick height (with nibbles or herringbone teeth)
Cost Reduction
One of the most important design goals for BrickRap is cost reduction. One example to achieve this is the rack and pinion carriage system for the printing plate. However with my current design there is a major drawback as the moving mass is increased by the fact that both (X and Y) motors are moving as the printing surface does. To overcome this I tried to use low weight cheap stepper motors. 28BJY-48 with a ULN2003 "driver". Connection to Ramps 1.4 was carried out using the free Pins at AUX4 and I managed to make the motor move using some modification of Repetier Firmware. However I am stuck there with some doubts how to redirect the signals from the dir/step protocol used with pollulu to the direct drive of the motor. As I completely fail in coding firmware this development is likely to be abandoned and I will go back to using Pollulu.
Stepper motor selection
The decision which type of stepper motor to use is quite hard. Using NEMA 17 would allow fast printer moves, but add a lot of weight. I decided to use cheap 28BJY-48 which are internally geared down, giving a high torque but very low rpm. As I do not intend to build a fast printer I hope that this will be sufficient for my purpose. Furthermore the power consumption should be much lower than with the big motors. Another positive side effect is the reduced printer noise. While my WolfStrap is much too loud, first tests with the 28BJY-48 motors are promising in that regard. However I am suffering from loosing steps. Up to now the motor is not controlled correctly, when I get a second Ramps board I will do more testing (up to now I always have to disconnect my WolfStrap motors because I am using that Ramps controller for testing).
Nozzle size selection
A nozzle size of 0.35 mm is used for printing my RepBricks. I print two perimeters and zero infill, and most parts a sufficiently strong. I am planning to use a bigger nozzle in the BrickRap as this would lead to less layers and less printing time for a given part. I recently ordered a 0.55 mm nozzle and will do some testing when it arrives, I am not sure if I can get down to 1 perimeter printing with that nozzle, but this would be great, because I then could greatly reduce printing time.
Ultra-low vitamin count
This is selected as major development goal, because I spent a lot of time ordering the vitamins for my WolfStrap-build. Burning two pollulus and waiting for new ones is also no nice experience.
Last but not least: Vitamin supply is costly and therefore counteracts cost reduction.
How to achieve this goal: - All structural parts are basic RepBricks - Drivetrain for X and Y movement is made of brick compatible Racks and Gears that fit directly to the Motor shaft - Z-Axis movement (Option 1): Printable screw-gear-system - Z-Axis movement (Option 2): Printable block and tackle System (fishing line as vitamin)
- Alternative electronics??? Cheap stepper motors?
Preliminary vitamin needs: stepper motors, electronics, endstops, wiring, HotEnd, Extruder-Hardware, Fan, (fishing line), screws and nuts for fixation of gears
Development Status:
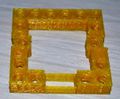
a Picture of a model made of commercial bricks will follow soon.
This is the first model of BrickRap: The frame is quite stable this way. The extruder shall fit into the hole on the upside and be moveable only in Z-direction (right now I have one "Wades Extruder" which nearly fits into the model, however work has to be done to reduce its size). Therefore the printing table has to have 2 degrees of freedom. The racks are indicated by the pink bricks. The motor mounts are indicated by the orange bricks. The motors will have the herringbone gears directly on their shafts. (I hope printing resolution will anyway be not too bad. Something in the 0.5 mm range would be fine for my purposes)
For the rack and pinion drive I imagine something like Rack and Pinion for X-Axis by theodleif
ToDo [06-09-2013]
- Wait for the last missing Pollulu for my WolfStrap to finally start printing.
- Create .stl for rack and pinion System which can directly be stacked on Standard double size brick.
- Create .stl for print optimized Brick (round Pins in the inside middle will be replaced by straight crossing lines)
[14-10-2013] MAYOR PROJECT CHANGE:
WolfStrap is running.
Experimenting with Duplo-like bricks showed some problems. Stability of the links is highly depending on printer settings. Furthermore, printing time is too high with such big bricks. Changing the type of bricks seems to be necessary. Some search led me to GridBeam on Thingiverse which is highly compatible to Lego-Technic bricks.
Printing those is faster and gives more consistent results. I therefore decided to change the Brick Type to GridBeam-like bricks. Some minor changes allowed for faster printing and increased compatibility to commercial connectors.
(Is BitBeam similar to gridbeam ?)
An experimental frame was succesfully built using mainly printed parts.
I hope to upload some photos soon. I have to increase my efforts on documentation ;-) and will do so, when some of my other projects allow me to do so.
[18-10-2013]
I finally managed to take some pictures:


This is the first version of BrickRap's X-Axis carriage. I used heavy paper as a platform for trials. Driving this by wire/string works quite OK, but sidewards stability is very low. Also the required vitamins are too much (some screws, nuts, ball bearings). I quit this design.
[20-10-2013]

V2 is the first working X-Axis carriage. Rack and gear are printed. The gear directly fits on the stepper motor shaft, however I am planning to include fixation. Running the 28BJY-48 stepper motor on the pollulu is quite slow. Maybe I have to increase gear size to increase printing speed.

I had some problems getting the stepper motors running. Rewiring the plug solved the problem. Now I drive the stepper using the Ramps/Pollulu combination. Here are the cable colors: plug-motor: yel-yel; blu-pin; or-blu; pin-or. The red cable is not used. Firmware settings for printer speed have to be VERY low. Fast changes of direction lead to losses of steps. Low acceleration seems to solve this, however I am not yet confident with these motors.
[22-10-2013]

This is the complete XY-carriage. Only one motor installed so far. The bed slides on tie wire (gardening wire), but the second axis movement is not as good as the top axis movement. I will have to remove the wire and replace it by something more rigid. Vitamins used: some (black) Lego Technic Pins, tie wire, 2 screws to fix the motor and the motor itself. The wire will hopefully be replaced soon.
[23-10-2013]

The wire is now replaced by printed slide bearings. Works quite OK, still a little bit of sidewards wobbling. I will have to work on the sliders. I also increased the free space for the gear in order to replace it with a bigger one.
[27-10-2013] Running out of filament. Last prints for this month: A holder for the 28BYJ48 stepper motor compatible to the other RepBricks.


[10-11-2013] Most likely there will be very few development here for the next 2 months.
[15-11-2013] Production of new bricks is halted due to a broken computer. However I keep thinking about this project. Until now there seems to be little effort on reprap.org to include the production of lactic acid into the project. In order to come closer to the goal of a self-replicating machine, it will however be necessary to include that process. My idea is to use some of my RepBricks to build a bioreactor for the fermentation of lactic acid. Until now, the rough plan is as follows: Print some peristaltic pumps (maybe I'll use a Shkolnikow pump [1] in combination with an eccentric disc or a gear with low teeth count) of course all of that modded to fit to the RepBrick system ;-). The discs or gears can be driven by the stepper motor type used for BrickRap. A cheap pH-sensor would be connected to the basic Arduino board. Furthermore a heating element could be controlled with Ramps-like electronics as it is done with the heating bed and extruder hot end. Stirring could be carried out by magnetic stirring also by a (stepper) motor controlled via Ramps-like electronics. Using the peristaltic pumps in combination with the pH-sensor would already allow for pH-stat fermentation control. Fed-batch or continuous operation of the bioreactor would be possible by using a (simple) liquid-level detection system and the use of sterile filters. In situ removal of lactic acid would arise the need for membranes (which are not likely to be non-vitamin for at least some more years ;-) or could be achieved by reactive extraction (which in my opinion is easier to realize at home with lower vitamin count - however I will have to double check that) The polymerization step is until now out of scope for me (I'll work on that, I promise ;-). Luckily lactic acid bacteria are sold in nearly every supermarket worldwide (I hope to find a homofermentative strain ;-) Sorry for that bunch of smilies, I just think it would be funny if lots of people have their very own bioreactor for much less than 300€/$ (just a rough estimate...). With maximum spent cell recycling one could produce lactic acid from sugar. Maybe I will work on an automated RepBrick-based greenhouse for sugar beets. Maybe then one more RepBrickReactor could be used for bioethanol production and supply the whole bunch of self-made stuff with bioenergy. I'll stop that post now before it runs out of control.
[22-07-2014] 2 months turned into a lot more. Lots of other - more important - stuff to do right now. Sorry for that. Hope to find some time when all three kids are sleeping at the same time ;-)
[28-12-2014] Finally I had some time to continue to work on BrickRap - See the results below:
Although the main goal of BrickRap is to reach ultra-low-vitamin-count, I decided to use some more vitamin (1m of threaded rod M5) as structural and functional part of BrickRap. 4 gears hold 4 nuts on the 4 pieces of threaded rod and are driven by a fully printed chain in order to carry out the z-axis movement of the (imaginary) extruder. I hope to buy another extruder soon, to make that BrickRap finally work.